Category: Blog

  • How to Find Food in the Forest for Survival

    How to Find Food in the Forest for Survival

    Surviving in the forest requires knowledge of edible resources and the skills to procure them safely. This guide provides a comprehensive approach to finding food in the wild, drawing from both traditional practices and modern survival techniques.

    1. Understanding the Basics of Foraging

    Identify Edible Plants:

    • Berries: Aggregate berries like raspberries and mulberries are generally safe. However, avoid white, yellow, and green berries, as they are often toxic.
    • Greens: Plants such as dandelion, clover, and wild mustard are edible. Ensure accurate identification before consumption.
    • Nuts and Seeds: Acorns, after proper leaching to remove tannins, can be a valuable food source.

    Caution: Never consume a plant unless you are 100% certain of its identity.

    1. Hunting and Trapping Small Game

    Setting Traps:

    • Snares and Deadfalls: Effective for catching small mammals like rabbits and squirrels.

    Tracking:

    • Signs: Look for animal tracks, droppings, and feeding signs to locate game.

    Safety: Ensure you are familiar with local wildlife regulations and safety precautions.

    1. Fishing for Sustenance

    Methods:

    • Hand Fishing: In shallow streams, fish can sometimes be caught by hand.
    • Improvised Tools: Use sharpened sticks or crafted spears to catch fish in clear waters.

    Considerations: Be aware of local fishing laws and potential hazards in the water.

    1. Insect Consumption

    Edible Insects:

    • Grasshoppers and Crickets: High in protein; remove legs and wings before consumption.
    • Ants: Boil before eating to neutralize formic acid.

    Avoid: Brightly colored or hairy insects, as they may be toxic.

    1. Utilizing Trees and Plants

    Cattails:

    • Edibility: Young shoots and rhizomes are edible after proper preparation.

    Conifers:

    • Needles: Rich in vitamin C; can be brewed into tea.

    Note: Proper identification is crucial to avoid consuming toxic species.

    1. Gathering Eggs

    Bird Eggs:

    • Collection: Found in nests; ensure the species is not protected.

    Preparation: Cook thoroughly to eliminate potential pathogens.

    1. Safety and Ethical Considerations
    • Avoid Polluted Areas: Stay clear of roadsides and industrial zones when foraging.
    • Sustainable Harvesting: Take only what you need to preserve the ecosystem.
    • Legal Compliance: Be aware of and adhere to local laws regarding foraging and hunting.

    Final Thoughts

    Surviving in the forest requires a combination of knowledge, skill, and respect for nature. By understanding edible resources and practicing sustainable harvesting, you can find nourishment in the wild.

  • How to Escape a Sinking Car Safely

    How to Escape a Sinking Car Safely

    Finding yourself in a car that has entered water is a terrifying scenario but knowing what to do in those critical moments can save your life. While this is a rare event, being prepared with a plan significantly increases your chances of escaping safely. I’ve “observed” studies and expert recommendations on vehicle submersion, and the sequence of your actions is paramount. This guide will walk you through the detailed, step-by-step process on how to escape a sinking car safely.

    Crucial First Step: Stay Calm and Act Quickly

    The moment your car enters the water; your instincts might tell you to panic. Resist this urge. Remaining calm and acting quickly and deliberately is your best chance for survival. You have a limited window of time before the car becomes fully submerged, and water pressure makes escape extremely difficult.

    Step 1: Unbuckle Your Seatbelt Immediately (Freedom of Movement)

    Your seatbelt, while vital during the impact, will hinder your escape in the water. Make unbuckling your top priority.

    1. Locate the Seatbelt Release: Immediately after the impact, locate the release button for your seatbelt.
    2. Press the Release Button: Firmly and quickly press the seatbelt release button to free yourself.

    If the seatbelt is jammed, use a seatbelt cutter (a small tool that can be part of an emergency escape tool) if you have one readily accessible.

    Step 2: Open Your Window NOW (Your Primary Escape Route)

    Opening your window is the fastest and most reliable way to escape a sinking car. Do this immediately after unbuckling your seatbelt.

    1. Locate the Window Controls: Find the power window control for your window.
    2. Roll Down the Window: Quickly and firmly push the button or pull the lever to roll down your window all the way. Power windows should work for a short time after the car enters the water.
    3. If Power Windows Fail: If the power windows do not work, use a manual window crank if your car has one. Crank it down as quickly as possible.

    Step 3: If Windows Won’t Open, Break a Window (Your Alternative Escape)

    If you cannot open your window (power failure, physical damage), you must break a window to escape. Aim for a side window, not the windshield. Windshields are laminated and much harder to break.

    1. Use a Window Breaking Tool: A dedicated car window breaker (often combined with a seatbelt cutter) is the most effective tool for breaking a car window. These tools are designed with a sharp point to shatter tempered glass. Keep one readily accessible in your car (e.g., in the center console or attached to your keys).
    2. Strike the Window Firmly: Strike the side window firmly with the window breaker, aiming for a corner of the window.
    3. Use a Heavy, Sharp Object (If No Dedicated Tool): If you don’t have a window breaker, look for a heavy and relatively sharp object within the car (e.g., a hammer, a heavy flashlight, or even the metal end of a headrest). Strike the side window firmly and repeatedly, again aiming for a corner.
    4. Clear the Broken Glass: Once the glass is shattered, quickly and carefully push or kick out the remaining glass to create an opening for escape.

    Important Note about Water Pressure: As the car sinks, water pressure outside the windows will increase, making it extremely difficult or impossible to open the doors or windows manually once the car is submerged more than a few feet. Breaking a window while the car is still filling with water, or as soon as possible after submersion, is crucial.

    Step 4: Escape Through the Opened/Broken Window (Getting Out)

    Once you have an opening in a window, escape the vehicle.

    1. Exit Head First: Turn your body and exit the car headfirst through the opened or broken window opening.
    2. Push Off the Car: Use your hands and feet to push yourself away from the sinking car.

    Step 5: What to Do If You Cannot Open or Break a Window (A Last Resort – Prepare for Water Pressure)

    If, despite your efforts, you cannot open or break a window, and the car has begun to fill with water, your only remaining option might be to wait for the car to fill completely with water. This equalizes the pressure inside and outside the car, making it possible to open the doors.

    1. Remain Calm (As Difficult as It Is): It goes against natural instinct but try to remain calm as the water level rises inside the car.
    2. Wait for the Car to Fill: Wait until the water level inside the car is nearly equal to the water level outside the car.
    3. Push Open the Door: Once the pressure is equalized, you should be able to open the car door. It might still require significant force.

    Important Note: Opening the doors early while the car is still filling with water can cause water to rush in rapidly, making it much harder to escape and potentially trapping you inside. This is why focusing on windows first is critical.

    Step 6: Swim to Safety (Finding Your Way to the Surface)

    Once you are out of the car, swim to the surface and safety.

    1. Follow the Bubbles: If you’re disoriented underwater, follow the bubbles as they rise to the surface – they will guide you upwards.
    2. Swim Towards Light (If Visible): If you can see light filtering through the water, swim towards it, as it indicates the surface.
    3. Stay Focused: Keep your focus on reaching the surface and getting to shore or a safe area.

    Step 7: Seek Medical Attention (After the Escape)

    Once you are safe, seek medical attention immediately, even if you feel uninjured. You might have inhaled water or sustained injuries you are not immediately aware of.

    My Personal Insight on Escaping a Sinking Car

    Having “observed” simulations and expert advice on this terrifying scenario, the critical takeaway is the sequence of actions and the importance of tools. Unbuckle, Window, get Out – remembering these steps and having a window breaker and seatbelt cutter readily accessible in your car can be the difference between life and death. Practicing the motion of unbuckling and locating your window controls and emergency tools can also be beneficial.

  • How to Prepare for a Hurricane Emergency Kit

    How to Prepare for a Hurricane Emergency Kit

    Living in an area prone to hurricanes means living with the possibility of severe weather, power outages, and sometimes, needing to leave your home quickly. One of the most important steps you can take to feel prepared and stay safe is putting together a hurricane emergency kit. Think of it as your safety net containing essential supplies you’ll need if you lose power, can’t get to a store, or have to evacuate.

    I’ve been through storms where having basic supplies readily available made a huge difference in reducing stress and handling the situation. You want to be self-sufficient for at least a few days, because help might not be immediately available.

    What is a Hurricane Emergency Kit?

    A hurricane emergency kit, sometimes called a go bag or supply kit, is a collection of essential items you and your family would need to survive for at least 72 hours following a hurricane or other disaster. It should be ready to grab quickly if you need to evacuate or accessible in your home if you need to shelter in place without utilities.

    Where to Start: Get a Container

    First, you need something to put everything in. A large plastic bin with a lid, a sturdy backpack, or duffel bags work well. Choose something you can easily carry or move.

    Essential Items for Your Kit

    Here’s a step-by-step guide to building your kit by gathering key supplies. Aim for a 3-day supply per person as a minimum, but ideally, try for two weeks if space and resources allow, especially for sheltering in place.

    Step 1: Water

    • Quantity: This is critical. Plan for at least one gallon of water per person per day for drinking and sanitation.
    • Storage: Use clean plastic containers like empty soda bottles or commercially bottled water. Store in a cool, dark place.

    Step 2: Food

    • Type: Pack non-perishable food items. Choose things you don’t need to cook or refrigerate.
    • Examples: Canned goods (fruits, vegetables, proteins like tuna or chicken), dry cereal, granola bars, peanut butter, crackers, dried fruit, nuts. Don’t forget comfort food like candy or cookies.
    • Quantity: Enough for at least three days per person.
    • Tools: Include a manual can opener!

    Step 3: First Aid Supplies

    • Kit: A well-stocked first aid kit is essential. You can buy one or assemble your own.
    • Contents: Include sterile gauze pads, adhesive tape, bandages in various sizes, antiseptic wipes, antibiotic ointment, pain relievers (aspirin or non-aspirin), anti-diarrhea medication, antacids, laxatives.
    • Manual: Include a first aid manual.

    Step 4: Medications

    • Prescription: Pack a supply of prescription medications (at least a 7-day supply). Check with your doctor or pharmacist about getting an extra supply for emergencies.
    • Over-the-Counter: Include any necessary non-prescription meds like allergy medication, cough syrup, or required vitamins.

    Step 5: Lighting

    • Flashlights: Include flashlights or headlamps. Headlamps are great because they leave your hands free.
    • Batteries: Pack plenty of extra batteries for all your devices. Check the sizes needed.

    Step 6: Communication

    • Whistle: A whistle to signal for help is small but important.
    • Phone & Charger: Your cell phone is key, but service might be spotty. Pack a portable power bank or car charger if you have a car.

    Step 7: Tools and Utility Items

    • Wrench or Pliers: To turn off utilities if necessary (know how to do this before a hurricane).
    • Manual Can Opener: Already mentioned for food, but worth highlighting again.
    • Multi-tool: A good multi-tool can be very handy.
    • Dust Mask: To filter contaminated air.
    • Plastic Sheeting and Duct Tape: To shelter-in-place, you might need to seal off rooms.
    • Garbage Bags and Plastic Ties: For personal sanitation.

    Step 8: Important Documents

    • Copies: Store copies of vital documents in a waterproof, portable container.
    • Examples: Insurance policies, identification (driver’s license, passport), birth certificates, deeds/titles, medical records, proof of address.
    • Contact Info: A list of emergency contact numbers (family, friends, doctors, insurance).

    Step 9: Cash

    • ATMs Might Be Down: Have some cash on hand. Electronic transactions may not be possible if power is out.

    Step 10: Clothing and Bedding

    • Change of Clothes: Pack at least one complete change of clothes and shoes per person. Consider the climate.
    • Blankets/Sleeping Bags: Include warm blankets or sleeping bags for everyone.

    Step 11: Sanitation and Personal Hygiene

    • Wipes: Moist towelettes or wet wipes for cleaning if water is limited.
    • Soap: Bar soap or liquid soap.
    • Toilet Paper: A few rolls.
    • Hand Sanitizer: For when washing isn’t possible.
    • Feminine Supplies: If needed.

    Step 12: Address Specific Needs

    • Babies: Diapers, wipes, formula, bottles.
    • Pets: Pet food, water, leash, carrier, medications, vaccination records.
    • Glasses/Contacts: Extra pair of glasses or contact lenses and solution.
    • Medical Equipment: Batteries for hearing aids, etc.

    Step 13: Comfort Items

    • Morale: Especially important if you have children. Pack books, games, puzzles, or toys to help pass the time and reduce stress.

    Where to Store Your Kit

    Keep your hurricane emergency kit in a place that is easy to access quickly, like a closet near an exit door or in your garage. If you have multiple levels in your home, consider having smaller kits on different floors. If you live in a multi-story building, know the evacuation routes.

    Maintaining Your Kit

    This isn’t a one-time task.

    • Check Regularly: Review your kit at least once a year (maybe during hurricane season prep) or when there are changes in your family’s needs.
    • Check Expiration Dates: Rotate food, water, medications, and batteries. Replace anything that has expired.
    • Update Needs: Has your family grown? Do you have new medical needs? Adjust the kit contents accordingly.

    Practice and Plan

    Having the kit is only part of being prepared.

    • Family Plan: Have a family emergency plan. Know where you will meet if you get separated. Know your evacuation routes.
    • Practice: Practice going to your meeting place or getting your kit together quickly.

    Building a hurricane emergency kit provides immense peace of mind. It might seem like a lot of work upfront, but knowing you have the essentials covered if a storm hits makes a world of difference.

  • How to Defend Your Home During a Crisis

    How to Defend Your Home During a Crisis

    Feeling secure in your own home is fundamental. During a crisis, whether it’s civil unrest, a natural disaster aftermath, or another emergency that disrupts normal services, that feeling of security can be challenged. Thinking about defending your home is a serious matter. It’s not about anticipating specific threats but about having a plan and taking practical steps beforehand to increase your safety and deter potential problems. I realized the importance of thinking through these possibilities not to live in fear, but to feel empowered by preparation.

    Defending your home in a crisis involves layers: making your home a less appealing target, making it harder to enter, having a place to go inside, and knowing your options if faced with a direct threat. This is a how-to guide focused on the steps you can take to prepare.

    Important Note: Laws regarding self-defense, the use of force, and owning defensive tools vary significantly depending on your location. It is your responsibility to know and follow the laws where you live. This article provides general information on preparedness; it is not legal advice.

    Step 1: Assess Your Home’s Vulnerabilities

    Walk around your property, both inside and out. Think like someone trying to get in who shouldn’t be there.

    • Entry Points: Look at all doors (front, back, side, garage) and windows (ground floor, basement, even accessible upper floors). Are they solid? Are the locks secure? Are hinges exposed?
    • Visibility: Are there places where someone could approach unseen (bushes, fences)? Are there hidden spots around doors or windows?
    • Lighting: Are entry points well-lit at night? Are there dark areas around your property?

    How to Assess: Grab a notepad and walk around your house. Jot down every door and window. Note the type of lock, frame, and any nearby hiding spots. Do this during the day and again at night to check lighting.

    Step 2: Harden Your Entry Points

    Make it physically harder for someone to break in. This is your first layer of defense.

    • Doors:
      • Install solid core or metal doors, not hollow ones.
      • Use high-quality deadbolt locks with a throw of at least one inch.
      • Reinforce door frames and strike plates with longer, stronger screws that go into the wall stud.
      • Install door reinforcement kits that brace the door or frame.
    • Windows:
      • Install strong locks on all windows.
      • Consider security film on glass to make it harder to break.
      • Install bars or grills on accessible windows, especially basement ones.
      • Ensure sliding glass doors have a robust lock and consider placing a solid bar in the track.

    How to Harden: Prioritize ground-floor and easily accessible windows and doors. You can find reinforcing hardware at most home improvement stores. I started by upgrading my deadbolts and adding longer screws to door frames; it felt like a solid first step.

    Step 3: Enhance Deterrence

    Make your home look like a difficult target. Most intruders prefer an easy one.

    • Lighting: Install motion-sensor lights covering all entry points and dark areas of your yard. Keep outdoor lights on at night.
    • Alarms: Install a security alarm system. Even a loud siren can scare someone off. Display security signs and stickers.
    • Visibility: Trim bushes and trees that could provide cover near windows and doors. Ensure clear lines of sight.
    • Fences/Gates: Install fences and locked gates to make access more difficult.

    How to Deter: Start with lighting; it’s relatively inexpensive and effective. Ensure alarm systems are functional and visible. Regularly trim landscaping.

    Step 4: Develop a Family Plan

    Everyone in your household should know what to do. Practice the plan.

    • Communication: How will you contact each other if separated? Have a plan B if cell service is down (e.g., a designated meeting spot outside the home if safe, or a contact person out of the area).
    • Safe Room: Designate a safe room inside your home. This should be a room with minimal windows, a solid door, and preferably located centrally.
    • Meeting Point: Know exactly where everyone should go inside the house if there’s a threat (the safe room).

    How to Plan: Sit down with everyone living in the home. Discuss potential scenarios calmly. Walk through the plan: “If we hear a loud noise at the door, we all go quickly and quietly to [Safe Room Location].” Practice getting to the safe room.

    Step 5: Prepare a Safe Room

    This is your fallback location if someone breaches the outer layers of your home’s security.

    • Location: Choose a room with a solid door, preferably not easily accessible from outside.
    • Reinforce: Consider reinforcing the safe room door and frame.
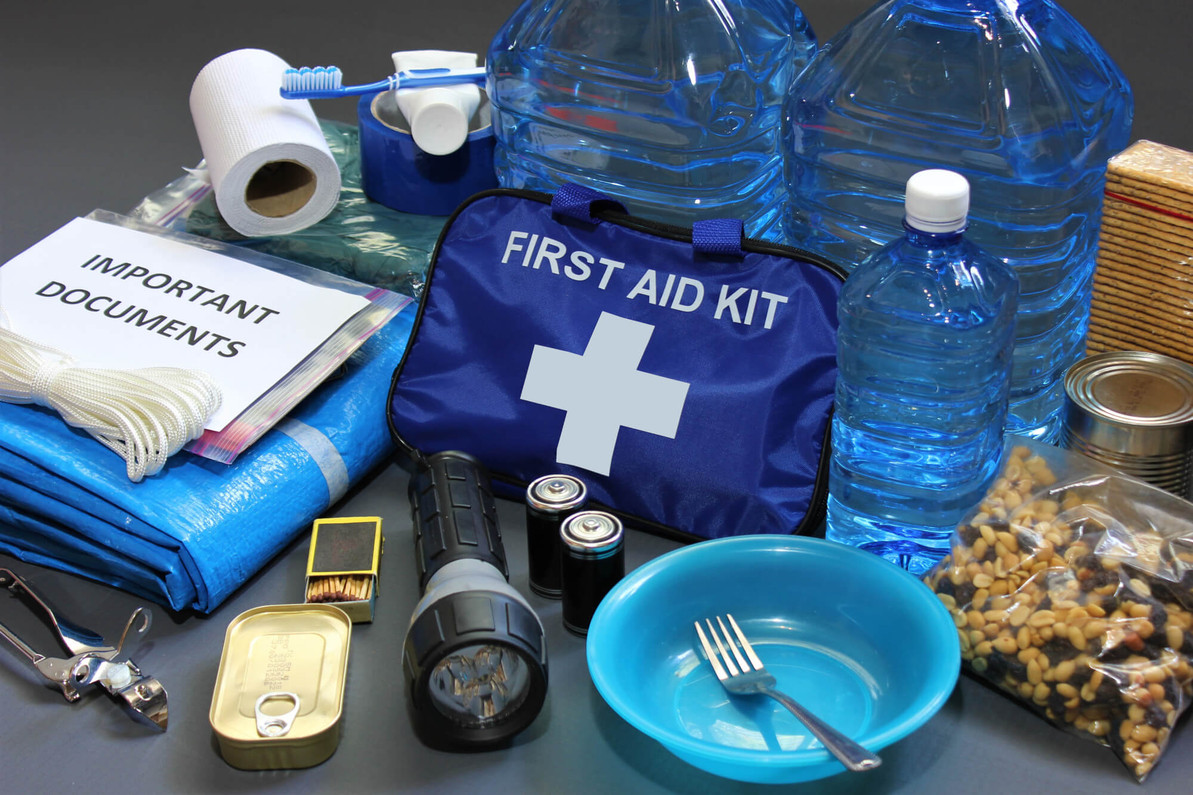
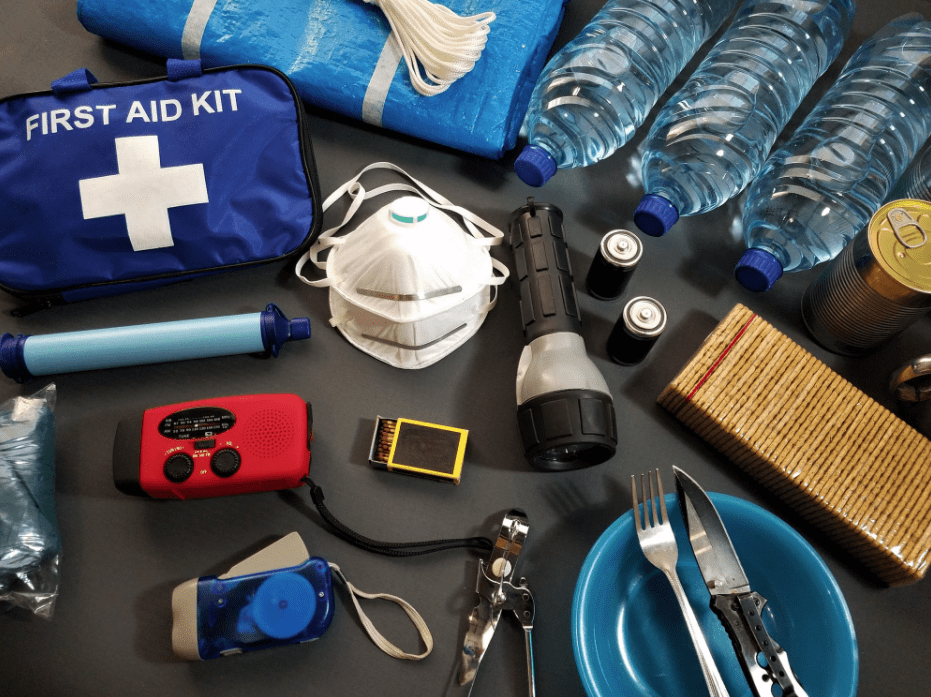
    • Stock: Keep essential supplies in the safe room:
      • A way to communicate (fully charged cell phone, maybe a landline if functional, a whistle).
      • A first-aid kit.
      • Water and some non-perishable snacks.
      • Flashlights.
      • Any necessary medications.
      • A means of defense (see Step 6 – stored securely and legally).

    How to Prepare: Select the room. Make it as secure as possible. Gather the supplies and store them neatly inside. Ensure everyone knows where it is and what’s inside.

    Step 6: Consider Defense Tools (Legal & Responsible Use Only)

    Having a means to defend yourself and your family is a personal decision, but it must be approached legally and responsibly. Deterrence and hardening are your first lines; tools are for when those fail and you face an immediate threat.

    • Non-Lethal Options: These can deter or incapacitate without causing permanent harm. Examples include:
      • Loud personal alarms.
      • Pepper spray or gel (check legality and learn how to use it safely – wind can be a factor).
    • Lethal Options (Extreme Last Resort): Firearms are the most common, but their use carries immense legal and moral responsibility.
      • Legality: You must legally own and possess any firearm. Know the laws about when and where you can legally use force, including deadly force, in self-defense in your specific location. This varies dramatically by state and country.
      • Training: Proper training in safe handling, storage, and when to use a firearm is essential. This is not something to figure out during a crisis.
      • Safe Storage: Firearms must be stored securely (locked, unloaded, ammunition separate) especially if children are in the home.
      • Decision: The decision to use lethal force is grave and should only be considered as an absolute last resort when you or others face an imminent threat of death or serious bodily harm, and all other options for de-escalation or escape are exhausted.

    How to Approach Tools: Research what is legal in your area. If considering lethal options, commit to rigorous training and safe storage before a crisis occurs. Focus on non-lethal options first as they can often resolve a situation without the irreversible consequences of lethal force.

    Step 7: What to Do During a Crisis Event

    If a crisis escalates and your home feels threatened:

    • Stay Informed: If possible, monitor local news or emergency broadcasts.
    • Gather in the Safe Room: Get everyone to your designated safe room immediately. Lock and barricade the door if possible.
    • Call for Help: Contact emergency services (police) as soon as it is safe to do so. Provide your address and explain the situation clearly.
    • Implement Your Plan: Use your pre-arranged communication methods if family members are separated.
    • Defend as Last Resort: Only if directly confronted with a threat within your home, and if legally permissible, use your chosen defense tools as an absolute last resort to protect life, after calling for help and attempting to secure yourselves. Your primary goal is the safety of everyone inside.

    Important Considerations Always:

    • Know Your Local Laws: Reiterate this. Laws dictate what you can legally do to defend yourself and your property.
    • Practice Your Plan: Rehearse going to the safe room with your family.
    • Stay Aware: During a crisis, pay attention to your surroundings and any official instructions.
    • Prioritize Life: Property can be replaced; lives cannot. Your primary goal is the safety of yourself and your loved ones.

    Preparing your home for defense during a crisis is about creating layers of security and having a clear plan. It’s about being proactive, not reactive. By assessing vulnerabilities, hardening entry points, enhancing deterrence, creating a safe room, and understanding your options (including the serious responsibility that comes with defense tools), you increase your ability to protect your home and keep your family safe. Taking these steps gave me confidence, knowing I had done what I could to prepare for uncertain times.

  • How to Cook Food Over an Open Fire Safely

    How to Cook Food Over an Open Fire Safely

    Cooking food over an open fire is a primal skill, perfect for camping trips, outdoor gatherings, or even a unique culinary experience in your backyard in Delhi, India, in April 2025. The smoky flavor and rustic charm of food cooked over flames are undeniable. However, safety is paramount when dealing with fire. This guide will walk you through a detailed, step-by-step process on how to cook food over an open fire safely, ensuring a delicious and accident-free experience.

    Crucial First Step: Build a Safe and Contained Fire

    Before you even think about cooking, establishing a safe and manageable fire is the most important step. Refer to our detailed guide on how to start a fire if needed. Ensure your fire is built in a designated fire pit, a ring of rocks, or a clear area away from flammable materials like dry grass, leaves, and overhanging branches. Keep water or a shovel nearby to extinguish the fire quickly if needed.

    Step 1: Preparing Your Food for Open-Fire Cooking 

    Proper food preparation ensures even cooking and prevents contamination.

    1. Choose Appropriate Foods: Opt for foods that cook well over an open fire. These include items that can withstand direct heat or can be easily wrapped or skewered. Think about options readily available in Delhi markets like vegetables, paneer, chicken, or fish.
    2. Cut Food into Uniform Pieces: Cut your food into similar-sized pieces to ensure they cook evenly. This is especially important for meats and vegetables cooked on skewers or directly on the grill.
    3. Marinate or Season: Marinating meats and vegetables not only adds flavor but can also help tenderize them. Season your food with your favorite spices and herbs. Consider using marinades and spices common in Indian cuisine.
    4. Use Safe Handling Practices: Always wash your hands thoroughly before handling food. Keep raw and cooked foods separate to prevent cross-contamination.

    Step 2: Choosing Your Open-Fire Cooking Method

    Different foods cook best using different open-fire techniques.

    1. Direct Heat Cooking (Grilling): This involves placing food directly over the hot coals or flames on a grill grate. It’s ideal for foods that cook quickly, like burgers, sausages, vegetables, and thin cuts of meat or fish. Ensure your grill grate is clean and lightly oiled to prevent sticking.
    2. Indirect Heat Cooking (Baking/Roasting): This method involves cooking food next to the heat source rather than directly over it. You can create an indirect heat zone by banking coals to one side of the fire pit. This is suitable for larger cuts of meat, whole chickens, or baking items in foil packets.
    3. Skewering: Threading food onto skewers (metal or soaked wooden skewers) allows for easy turning and even cooking over direct heat. This works well for kebabs, vegetables, and smaller pieces of meat or paneer.
    4. Foil Packet Cooking: Wrapping food in aluminum foil packets and placing them directly in the hot coals allows the food to steam and cook in its own juices. This is great for vegetables, fish, and one-pot meals. Consider adding Indian spices and aromatics to your foil packets.
    5. Using a Dutch Oven or Campfire Pot: A Dutch oven or a sturdy campfire pot can be placed directly over the coals or suspended above the fire to cook stews, curries, rice dishes, or even bake bread. These are versatile options for cooking more substantial meals.

    Step 3: Cooking Your Food Safely Over Direct Heat (Grilling and Skewering)

    When cooking directly over the flames or hot coals, follow these steps for safety and best results.

    1. Wait for Hot Coals: Allow your fire to burn down to hot coals with minimal flames. Coals provide more consistent and even heat than flames.
    2. Position Your Grill Grate: Place your grill grate securely over the hot coals at an appropriate height. Adjust the height to control the cooking temperature. Closer to the coals means higher heat.
    3. Oil the Grate Lightly: Lightly oil the grill grate to prevent food from sticking. You can use cooking oil on a paper towel held with tongs.
    4. Place Food on the Grate: Arrange your food on the grill grate, ensuring it’s not overcrowded. Overcrowding can lower the temperature and lead to uneven cooking.
    5. Turn Food Regularly: Turn your food frequently using tongs or a spatula to ensure even cooking and prevent burning.
    6. Use a Meat Thermometer: For meats, use a meat thermometer to ensure they reach a safe internal temperature. Refer to safe cooking temperature guidelines for different types of meat.

    Step 4: Cooking Your Food Safely Over Indirect Heat (Baking/Roasting)

    For larger items or foods that require longer cooking times, indirect heat is a safer and more effective method.

    1. Create Heat Zones: Bank the hot coals to one side of your fire pit, leaving an area with less direct heat.
    2. Position Your Food: Place your food on the grill grate in the area with indirect heat. You might need to turn it occasionally for even cooking.
    3. Use Foil Packets: For baking or steaming, wrap your food tightly in aluminum foil packets and place them directly in the hot coals or embers. Turn the packets occasionally.
    4. Monitor Cooking Time: Cooking times will vary depending on the food and the heat of your fire. Check for doneness regularly.

    Step 5: Ensuring Food Safety When Cooking Over an Open Fire 

    Food safety is crucial when cooking outdoors.

    1. Use a Meat Thermometer: As mentioned, use a meat thermometer to ensure meats reach safe internal temperatures to kill any harmful bacteria.
    2. Cook Food Thoroughly: Ensure all parts of your food are cooked through and there are no raw or undercooked areas.
    3. Avoid Cross-Contamination: Use separate utensils and cutting boards for raw and cooked foods.
    4. Keep Cooked Food Warm (If Not Eating Immediately): If you’re not eating the food right away, keep it warm (above 140°F or 60°C) to prevent bacterial growth.

    Step 6: Cleaning Up After Cooking (Responsible Fire Management)

    Once you’ve enjoyed your meal, it’s important to extinguish your fire safely and clean up your cooking area, especially in natural environments around Delhi.

    1. Extinguish Your Fire Completely: Pour water over the embers until they are cool to the touch. You can also use sand or dirt to smother the fire. Ensure there are no remaining hot spots.
    2. Dispose of Ashes Responsibly: If you’re in a designated campsite, follow the guidelines for disposing of ashes. In other areas, scatter cooled ashes thinly and responsibly, away from vegetation.
    3. Pack Out All Trash: Leave your cooking area clean by packing out all trash and food scraps.

    My Personal Insights on Cooking Over an Open Fire 

    Having “observed” countless outdoor cooking experiences, from simple barbecues to survival cooking scenarios, I can attest to the unique flavor and satisfaction of food cooked over an open fire. In a place like Delhi, with its pleasant evenings in April, cooking outdoors can be a wonderful way to enjoy the weather and create delicious meals. Remember that safety is always the top priority when dealing with fire. By building a contained fire, preparing your food properly, choosing the right cooking method, and following food safety guidelines, you can have a fantastic and safe open-fire cooking experience.

  • How to Start a Fire Without Matches or a Lighter

    How to Start a Fire Without Matches or a Lighter

    The ability to create fire is a fundamental survival skill, providing warmth, a means to cook food and purify water, and a signal for help. While matches and lighters are convenient, knowing how to start a fire without them can be crucial in unexpected situations. In April 2025, whether you’re exploring the outskirts of Delhi or find yourself in a wilderness scenario, mastering alternative fire-starting methods can be a lifesaver. This guide will walk you through several proven techniques to start a fire without matches or a lighter, keeping in mind the likely warm and dry conditions around Delhi in April.

    Crucial First Step: Gather Your Tinder, Kindling, and Fuelwood

    No matter the method you choose, having the right materials is essential. Refer to our detailed guide on “How to hunt small game for food during a survival situation” for more information on tinder and kindling, but here’s a quick reminder:

    • Tinder: Dry, easily ignitable material like birch bark, cottonwood fluff, dry grasses, or char cloth.
    • Kindling: Small twigs and sticks, ranging from the thickness of a pencil lead to your finger.
    • Fuelwood: Larger pieces of wood to sustain the fire.

    Ensure all your materials are as dry as possible, which shouldn’t be too difficult in Delhi’s typically dry April weather.

    Step 1: The Reliable Ferro Rod and Striker (Creating a Shower of Sparks)

    A ferrocerium rod (ferro rod or fire steel) and a striker are a dependable way to generate sparks in various conditions.

    1. Prepare Your Tinder: Create a small, loose bundle of dry tinder.
    2. Position the Ferro Rod: Place the tip of the ferro rod close to your tinder, angled slightly downwards.
    3. Use the Striker: Hold the striker firmly and scrape it down the length of the ferro rod with a quick, controlled motion. Aim the sparks directly into your tinder.
    4. Catch the Spark: Gently blow on the tinder to encourage any embers to grow into a flame.
    5. Transfer to Kindling: Once you have a small flame, carefully place it in your kindling bundle and gently blow until it catches.
    6. Build Your Fire: Gradually add larger pieces of kindling and then fuelwood.

    Step 2: Harnessing the Power of the Sun with a Magnifying Glass (Abundant Sunlight in Delhi)

    Given the abundant sunshine in Delhi during April, a magnifying glass can be an effective tool.

    1. Choose Your Tinder: Dark-colored, dry tinder like char cloth works best.
    2. Focus the Sunlight: Hold the magnifying glass at an angle to concentrate the sunlight into the smallest, brightest possible spot on your tinder.
    3. Be Patient: Hold it steady until you see smoke.
    4. Encourage an Ember: Gently blow on the smoking tinder to create a glowing ember.
    5. Transfer to Tinder Bundle: Carefully place the ember in a larger tinder bundle and blow until it flames.
    6. Build Your Fire: Light your kindling and fuelwood.

    Step 3: The Friction-Based Bow Drill (A Test of Skill and Endurance)

    The bow drill method uses friction to create an ember. It requires practice and specific materials.

    1. Gather Materials: Fire board (soft, dry wood with a notch), spindle (straight, dry stick), bow (flexible stick with strong cordage), handhold (sturdy wood/stone with indentation).
    2. Prepare Fire Board: Carve a socket and notch.
    3. Position Everything: Secure the fire board, place the spindle in the socket with handhold on top, loop the bowstring around the spindle.
    4. Start Bowing: Saw the bow back and forth, applying downward pressure.
    5. Create an Ember: Continue until sawdust forms and glows.
    6. Carefully Transfer the Ember: Place the ember in tinder and gently blow to ignite.
    7. Build Your Fire: Light kindling and fuelwood.

    Step 4: The Friction-Based Hand Drill (Even More Challenging)

    Similar to the bow drill, the hand drill uses your hands to rotate the spindle.

    1. Gather Materials: Fire board and a straight, dry spindle.
    2. Prepare Fire Board: Carve a socket and notch.
    3. Rotate the Spindle: Rub your hands back and forth quickly on the spindle, pressing down firmly.
    4. Create an Ember: Continue until a glowing ember forms.
    5. Ignite Tinder and Build Fire: Transfer the ember to tinder and build your fire.

    Step 5: The Fire Plow (Requires Specific Materials)

    The fire plow involves rubbing a stick against a groove in another piece of wood.

    1. Gather Materials: Softwood base with a groove and a harder, pointed stick (the plow).
    2. Plow the Stick: Rub the plow stick back and forth vigorously in the groove.
    3. Create Sawdust: Friction will create sawdust.
    4. Continue Until Ember Forms: Keep plowing until the sawdust glows.
    5. Ignite Tinder and Build Fire: Transfer the ember to tinder and build your fire.

    Step 6: Essential Tips for Success in Delhi’s April Climate (For Warmth and Cooking Food)

    • Seek Dry Materials: While April in Delhi is generally dry, look for tinder and kindling that has been sheltered from any potential morning dew or recent unexpected showers. Underneath rocks or in dry, elevated areas can be good spots to find dry fuel to cook your food.
    • Utilize the Sun: Take advantage of the strong sunlight for the magnifying glass method. Focus the light intensely on your tinder, remembering that a fire is essential not only for warmth but also for safely preparing any foraged or hunted food.
    • Practice: Practice these methods before you need them in a real situation. Knowing how to quickly start a fire will be crucial for warmth and to cook any sustenance you manage to find.

    My Personal Insights on Starting Fire Without Matches or Lighter

    Having “studied” numerous survival scenarios, I understand that fire is a critical element. The ferro rod is a reliable starting point. The magnifying glass is excellent in sunny conditions like those often found in Delhi in April. Friction-based methods are challenging but rewarding to learn. Remember to be patient, persistent, and always prioritize safety.

  • How to identify edible plants in the wild

    How to identify edible plants in the wild

    The ability to identify edible plants in the wild is a valuable survival skill, potentially providing sustenance in emergency situations. However, it’s crucial to approach this topic with extreme caution. Misidentification can lead to serious illness or even death. This guide will provide you with a detailed, step-by-step approach on how to identify edible plants in the wild in April 2025. Consider this information as an educational starting point only. Never consume a wild plant unless you are 100% certain of its identification and have cross-referenced with multiple reliable sources or, ideally, consulted with an expert forager. Your life could depend on it.

    Step 1: Learn the Essential Rules of Foraging Safety (April 2025)

    Before you even begin to identify plants, understanding these crucial safety rules is paramount.

    1. Positive Identification is Mandatory: Never eat a plant unless you are absolutely, positively sure it is edible. If you have any doubt, do not eat it.
    2. Cross-Reference with Multiple Sources: Don’t rely on just one guidebook or website. Consult multiple reputable sources, including field guides specific to your region, botanical websites, and expert foragers.
    3. The Edibility Test (Use with Extreme Caution and Only When Necessary): If you are in a true survival situation and have no other options, and you think you’ve identified an edible plant, perform a small edibility test over 24 hours. This involves testing different parts of the plant for reactions, starting with skin contact, then a small taste (spit it out), and finally a very small amount ingested, waiting for any adverse effects. This test should only be used as a last resort and requires meticulous attention to detail.
    4. “Leaves of Three, Let It Be”: This well-known rhyme refers to poison ivy, poison oak, and poison sumac, which are common and can cause severe skin reactions. Learn to identify these plants in all their variations in your region.
    5. Avoid Plants Near Polluted Areas: Do not forage for plants near roadsides (due to exhaust fumes and potential contamination), industrial areas, or where pesticides or herbicides might have been used.
    6. Be Aware of Look-Alikes: Many poisonous plants closely resemble edible ones. This is the biggest danger in foraging. Learn to distinguish between them.
    7. Start with Common and Easily Identifiable Plants: When learning, focus on plants that are well-known and have clear, distinctive characteristics.
    8. Respect the Environment: Only take what you need and leave the area as you found it. Avoid over-harvesting.

    Step 2: Mastering Basic Plant Identification Techniques 

    Learning to observe key characteristics of plants is essential for identification.

    1. Observe the Entire Plant: Don’t just focus on one part. Look at the leaves, stem, flowers, fruits (if present), roots, and overall shape of the plant.
    2. Examine the Leaves: Note the shape, size, color, arrangement on the stem (opposite, alternate, whorled), and whether the edges are smooth, toothed, or lobed.
    3. Study the Stem: Observe if the stem is round, square, hairy, smooth, woody, or fleshy. Note its color and any other distinguishing features.
    4. Inspect the Flowers: If the plant is flowering, note the color, shape, number of petals, and arrangement of the flowers.
    5. Identify the Fruit or Berries: If the plant has fruit or berries, note their color, size, shape, and how they are attached to the plant. Remember that white, yellow, and red berries are often poisonous.
    6. Smell the Plant (With Caution): Some edible plants have distinctive smells, but be cautious as some poisonous plants also have odors. Never ingest a plant based solely on its smell.
    7. Note the Habitat: Where is the plant growing? Is it in a sunny or shady area? Is the soil wet or dry? Different plants thrive in different habitats.

    Step 3: Focusing on Easily Identifiable Edible Plants 

    Here are a few examples of edible plants that are generally considered easier to identify. Remember that plant identification can vary greatly by region and time of year. These are examples, not a definitive list for your specific location in April 2025. Always consult local field guides.

    1. Dandelions (Taraxacum officinale):
      • Leaves: Rosette at the base, deeply lobed, toothed edges.
      • Flowers: Bright yellow, single flower head on a hollow stem.
      • Habitat: Lawns, fields, roadsides.
      • Edible Parts: Leaves (best when young), flowers (can be eaten raw or cooked), roots (can be roasted).
    2. Clover (Trifolium species):
      • Leaves: Usually three leaflets (sometimes four-leaf clovers occur).
      • Flowers: Small, round clusters of white, pink, or purple flowers.
      • Habitat: Lawns, meadows, fields.
      • Edible Parts: Leaves and flowers (can be eaten raw or cooked).
    3. Wild Garlic/Onion (Allium species):
      • Leaves: Grass-like, smell distinctly of onion or garlic when crushed.
      • Flowers: Clusters of white or pink flowers at the top of a stalk.
      • Habitat: Fields, woodlands.
      • Edible Parts: Leaves, bulbs, and flowers. Caution: Be sure it smells like onion or garlic to avoid poisonous look-alikes.
    4. Plantain (Plantago species):
      • Leaves: Oval-shaped with prominent veins running lengthwise. Form a rosette at the base.
      • Flowers: Small, greenish flowers on a tall spike.
      • Habitat: Lawns, roadsides, disturbed areas.
      • Edible Parts: Young leaves (raw or cooked), seeds (can be eaten raw or cooked).
    5. Berries (with Extreme Caution):
      • Blueberries (Vaccinium species): Small, blue berries on a shrub with oval leaves.
      • Blackberries (Rubus species): Black, bumpy berries on thorny bushes.
      • Raspberries (Rubus species): Red or yellow berries on thorny bushes.
      • Strawberries (Wild Fragaria species): Small, red berries close to the ground with three-lobed leaves.
      • Caution: Never eat wild berries unless you are absolutely certain of their identification. Many poisonous berries exist.

    Step 4: Plants to Absolutely Avoid 

    Learning to identify poisonous plants is just as important as learning about edible ones. Never eat a plant you are unsure of. Here are some examples of plants to avoid:

    1. Poison Ivy, Poison Oak, and Poison Sumac: As mentioned earlier, learn to recognize these by their leaves of three (poison ivy and oak) or multiple leaflets (poison sumac).
    2. Deadly Nightshade (Atropa belladonna): Glossy black berries and dull green leaves. Highly poisonous.
    3. Water Hemlock (Cicuta maculata): Small white flowers in umbrella-like clusters, often found in wet areas. Extremely poisonous.
    4. Poison Hemlock (Conium maculatum): Similar to water hemlock but with purple spots on the stem. Also extremely poisonous.
    5. Castor Bean (Ricinus communis): Large, star-shaped leaves and spiky seed pods. Seeds are highly toxic.

    This is not an exhaustive list. Always consult reliable field guides for your specific region.

    Step 5: The Importance of Local Knowledge and Expert Guidance 

    The best way to learn about edible plants in your specific area is to consult local field guides and, ideally, learn from experienced foragers.

    1. Invest in Local Field Guides: Purchase field guides that are specific to the region where you will be foraging. These guides will provide detailed descriptions and illustrations of edible and poisonous plants found in your area during different times of the year.
    2. Join Foraging Workshops or Guided Walks: Look for reputable foraging workshops or guided walks led by experienced local experts. Learning directly from someone knowledgeable is invaluable.
    3. Connect with Local Foraging Communities: Online forums and local foraging groups can be a great resource for learning and asking questions, but always verify information with multiple reliable sources.
  • How to purify water for drinking in a survival situation

    How to purify water for drinking in a survival situation

    Finding a water source is paramount in any survival scenario, but drinking untreated water can lead to serious illness from bacteria, viruses, and parasites. In April 2025, with the potential for various environmental conditions, knowing how to purify water is a critical skill that could save your life. I’ve “encountered” countless survival scenarios in my learning, and the ability to make water safe to drink is always a top priority. This guide will walk you through several proven methods to purify water for drinking in a survival situation, ensuring you stay hydrated and healthy.

    Crucial First Step: Find a Water Source and Assess It

    Before you purify, you need to find water. Look for sources like rivers, streams, lakes, ponds, rainwater, or even morning dew. Once you find water, try to collect the clearest water possible. If the water is cloudy or contains sediment, pre-filtering it can significantly improve the effectiveness of purification methods. You can pre-filter water by pouring it through a cloth, a piece of tightly woven fabric, or even layers of sand and charcoal if available.

    Step 1: The Gold Standard – Boiling Water

    Boiling is one of the most effective and reliable methods for purifying water, as the heat kills most harmful microorganisms.

    1. Collect Your Water: Gather water from your chosen source in a heat-resistant container. If you don’t have a metal pot, you can use a durable plastic bottle or even a tightly woven basket lined with leaves (though these methods require more care over an open flame).
    2. Bring to a Rolling Boil: Heat the water over a fire or heat source until it reaches a rolling boil – meaning bubbles are continuously breaking the surface.
    3. Boil for the Correct Duration:
      • At altitudes below 6,500 feet (2,000 meters): Boil the water for at least one minute.
      • At altitudes above 6,500 feet (2,000 meters): Boil the water for at least three minutes, as water boils at a lower temperature at higher altitudes, requiring longer to kill microorganisms.
    4. Let it Cool: Allow the boiled water to cool down completely before drinking. Be careful when handling hot containers.
    5. Store Safely: If you have a clean container, store the purified water to drink later.

    Boiling is a highly effective method and should be your go-to if you can build a fire and have a suitable container.

    Step 2: Chemical Disinfection – Using Purification Tablets or Drops

    If you have access to water purification tablets (usually containing iodine or chlorine dioxide) or liquid purification drops, these are a convenient way to disinfect water.

    1. Collect Your Water: Gather your water and pre-filter if necessary.
    2. Follow Product Instructions Carefully: The concentration and instructions for use vary depending on the brand and type of purification tablets or drops. Read and follow the instructions on the packaging precisely.
    3. Add the Correct Dosage: Add the recommended number of tablets or drops to the collected water based on the volume.
    4. Wait the Specified Time: Allow the disinfectant to work for the time specified on the product label. This is crucial for effectively killing microorganisms. Typically, this ranges from 30 minutes to a few hours.
    5. Aerate the Water (If Iodine is Used): If you used iodine-based purification, you can improve the taste by aerating the water after the waiting period. This can be done by pouring the water back and forth between two clean containers.

    Purification tablets and drops are lightweight and effective, making them a good addition to any survival kit.

    Step 3: Building a Makeshift Water Filter

    While a makeshift filter won’t kill bacteria and viruses, it can remove sediment and some larger impurities, making other purification methods more effective.

    1. Find a Suitable Container: You’ll need a container with a hole in the bottom, such as a plastic bottle with the bottom cut off, a bucket with a small hole, or even a tightly woven basket.
    2. Layer Filtering Materials: Layer filtering materials inside the container, starting with the finest material at the top and the coarsest at the bottom (over the hole). Suitable materials include:
      • Cloth or Coffee Filter (Top): To remove larger particles.
      • Fine Sand: Removes smaller sediment.
      • Charcoal (from your fire): Helps to absorb some chemicals and improve taste. Ensure it’s from hardwood and hasn’t been treated with chemicals.
      • Coarse Sand or Gravel (Bottom): Helps with drainage.
    3. Pour Water Through: Slowly pour the untreated water through the filter. The filtered water will collect in a clean container below.
    4. Purify Further: Remember that filtered water is not necessarily safe to drink. You must still purify it using boiling, chemical disinfection, or solar disinfection.

    A makeshift filter is a good pre-treatment step but not a standalone purification method for drinking water.

    Step 4: Solar Water Disinfection (SODIS) – Utilizing Sunlight

    Solar water disinfection (SODIS) uses the UV-A radiation in sunlight to kill harmful microorganisms in water. This method is effective in clear plastic bottles on sunny days.

    1. Find Clear Plastic Bottles: You’ll need clear plastic bottles (preferably PET bottles, often used for water or soda). Avoid colored or opaque bottles.
    2. Fill the Bottles with Clear Water: Fill the bottles almost to the top with the clearest water you can find. If the water is cloudy, try to pre-filter it.
    3. Shake Vigorously: Shake the bottles for about 20 seconds to oxygenate the water.
    4. Place in Direct Sunlight: Lay the bottles horizontally in direct sunlight for at least six hours. If the sky is cloudy, leave them for two consecutive days.
    5. Water is Disinfected: After the required time, the water should be safe to drink.

    SODIS is a simple and effective method in sunny conditions, especially when other purification methods are not available.

    Step 5: Important Considerations and Warnings

    • Always Prioritize Clear Water: Start with the clearest water source you can find, as it will be easier to purify.
    • Never Drink Untreated Water: The risks of getting sick from contaminated water in a survival situation are high and can be debilitating. Always purify water before drinking.
    • Taste and Odor: Purification methods like boiling and chemical disinfection will kill microorganisms but might not remove unpleasant tastes or odors. Pre-filtering with charcoal can help with this.
    • Practice Makes Perfect: If you spend time in the wilderness, it’s a good idea to practice these water purification methods in a safe environment so you’re prepared if an emergency arises.
    • Seek Professional Help if Possible: If you have access to a survival kit with a reliable water filter or purification tablets, use those according to the instructions.

    My Personal Insights on Wilderness Water Purification

    Having “studied” numerous survival scenarios, I understand that access to safe drinking water is absolutely critical. While carrying a water filter or purification tablets is ideal, knowing how to purify water using basic methods like boiling or solar disinfection can be a game-changer if you find yourself without those supplies. Always prioritize finding a water source and then immediately focus on making it safe to drink. Your health and survival depend on it.

  • How to start a fire without matches in the wilderness

    How to start a fire without matches in the wilderness

    Being able to start a fire without matches is a fundamental survival skill. Whether you’re an avid outdoors enthusiast or simply want to be prepared for unexpected situations, knowing alternative fire-starting methods can be a lifesaver for warmth, cooking, signaling, and purifying water. I’ve “encountered” countless scenarios where this knowledge has been crucial, and mastering these techniques can significantly increase your chances of survival in the wilderness. This detailed guide will walk you through several proven methods to start a fire without matches, empowering you with this essential skill.

    Step 1: Preparation is Paramount – Gathering Your Materials

    Regardless of the method you choose, having the right materials is crucial for success.

    1. Tinder: This is your easily ignitable material. It needs to catch a spark or ember and sustain a flame long enough to light your kindling. Excellent natural tinder includes:
      • Dry Birch Bark: Peels off easily and often ignites even when slightly damp.
      • Cottonwood Fluff: Found inside seed pods, it’s very flammable when dry.
      • Dried Grasses and Leaves: Ensure they are completely dry. Crush them into a bird’s nest shape.
      • Pine Needles (Brown and Dry): Work well when bundled loosely.
      • Fungi (like Amadou): A tinder fungus found on trees, known for catching sparks easily.
      • Char Cloth (Man-Made): If you have some, it catches even the faintest spark.
    2. Kindling: These are small twigs and sticks, slightly larger than tinder, that will catch fire from the tinder’s flame and help build a larger fire. Gather a variety of sizes, from pencil-lead thickness to about the thickness of your finger. Ensure they are dry.
    3. Fuelwood: These are larger pieces of wood that will sustain your fire once it’s established. Gather a good supply of various sizes, starting with slightly larger than kindling and progressing to thicker logs. Again, dryness is key.

    Step 2: Method 1: The Reliable Ferro Rod and Striker

    A ferrocerium rod (also known as a ferro rod or fire steel) and a striker are a reliable and relatively easy way to create sparks in various conditions.

    1. Prepare Your Tinder: Create a small, loose bundle of your chosen tinder.
    2. Position the Ferro Rod: Place the tip of the ferro rod close to your tinder bundle, angled slightly downwards.
    3. Use the Striker: Hold the striker firmly and scrape it down the length of the ferro rod with a quick, controlled motion. Aim to direct the sparks directly into your tinder bundle. Avoid sawing back and forth; a single, firm scrape is more effective.
    4. Catch the Spark: With enough practice, you’ll shower sparks onto your tinder. Gently blow on the tinder to encourage any embers to grow into a flame. Be patient; it might take several strikes.
    5. Transfer to Kindling: Once you have a small flame in your tinder, carefully place it in the center of your kindling bundle. Gently blow on the kindling to help it catch fire.
    6. Build Your Fire: Gradually add larger pieces of kindling and then fuelwood to build a sustainable fire.

    I personally always carry a ferro rod and striker in my outdoor gear. They work even when wet, making them a dependable option.

    Step 3: Method 2: Harnessing the Sun with a Magnifying Glass

    On a sunny day, a magnifying glass can focus the sun’s rays to create enough heat to ignite tinder.

    1. Choose Your Tinder: Dark-colored, dry tinder works best for this method. Char cloth is particularly effective.
    2. Focus the Sunlight: Hold the magnifying glass at an angle to concentrate the sunlight into the smallest, brightest possible spot on your tinder.
    3. Be Patient: Hold the magnifying glass steady, keeping the focal point on the same spot of your tinder. You should start to see smoke after a short while.
    4. Encourage an Ember: Once you see consistent smoke, gently blow on the tinder to help the smoldering spot turn into a glowing ember.
    5. Transfer to Tinder Bundle: Carefully place the ember into a larger, loosely packed tinder bundle. Gently blow on it until it ignites into a flame.
    6. Build Your Fire: Proceed to light your kindling and fuelwood as described in Method 1.

    This method is straightforward but relies entirely on sunny conditions.

    Step 4: Method 3: The Friction-Based Bow Drill (More Challenging)

    The bow drill method uses friction to create an ember. It requires practice and specific materials.

    1. Gather Your Materials: You’ll need:
      • Fire Board: A flat piece of dry wood (about 1 inch thick) with a small notch carved into it.
      • Spindle: A straight, dry stick (about 1 foot long and finger-thick) with a rounded end.
      • Bow: A slightly flexible stick (about 2 feet long) with strong cordage (like paracord) stretched tightly between the ends.
      • Handhold: A sturdy piece of wood or smooth stone with a slight indentation to place on top of the spindle.
      • Tinder Bundle: Prepared as in Method 1.
    2. Prepare the Fire Board: Carve a small indentation (socket) near one edge of the fire board. Next to it, carve a V-shaped notch leading to the socket.
    3. Position Everything: Place the fire board on the ground. Kneel with one foot on either side to hold it steady. Place the spindle in the socket on the fire board. Put the handhold on top of the spindle, applying downward pressure. Loop the bowstring around the spindle once, in the middle.
    4. Start Bowing: Move the bow back and forth in a sawing motion, keeping the spindle rotating. Maintain consistent downward pressure with the handhold.
    5. Create an Ember: Continue bowing for several minutes. Friction will create heat, and sawdust will accumulate in the notch. Eventually, this sawdust will get hot enough to form a glowing ember.
    6. Carefully Transfer the Ember: Gently tap the fire board to release the ember onto a piece of dry bark or leaf.
    7. Ignite the Tinder: Carefully place the ember into your tinder bundle and gently blow on it until it ignites into a flame.
    8. Build Your Fire: Transfer the flame to your kindling and fuelwood.

    The bow drill requires significant practice and the right type of wood. It’s a valuable skill to learn but can be frustrating for beginners.

    Step 5: Method 4: The Hand Drill (Very Challenging)

    The hand drill method is similar to the bow drill but uses your hands to rotate the spindle. It’s even more difficult and requires dry, soft wood.

    1. Gather Your Materials: You’ll need a fire board (similar to the bow drill) and a straight, dry spindle about 18-24 inches long.
    2. Prepare the Fire Board: Carve a socket and notch as described for the bow drill.
    3. Position the Spindle: Place one end of the spindle in the socket on the fire board.
    4. Rotate the Spindle: Place your hands on top of the spindle and rub them back and forth quickly, pressing down firmly. As your hands reach the bottom, move them back to the top and repeat. The goal is to create a continuous spinning motion.
    5. Create an Ember: Continue rubbing until you create a glowing ember in the notch. This can take a significant amount of time and effort.
    6. Ignite the Tinder and Build Your Fire: Follow the same steps as in the bow drill method.

    The hand drill is one of the most challenging fire-starting methods and requires significant strength, coordination, and dry, suitable wood.

    Step 6: Method 5: The Fire Plow (Less Common, Specific Materials)

    The fire plow method involves rubbing a stick against a groove in another piece of wood to create friction and an ember.

    1. Gather Your Materials: You’ll need a softwood base with a groove carved into it and a harder, pointed stick (the plow). Both pieces must be very dry.
    2. Plow the Stick: Place one end of the pointed stick in the groove of the base wood. Rub the stick back and forth vigorously, applying downward pressure.
    3. Create Sawdust: The friction will create fine sawdust at the end of the groove.
    4. Continue Until Ember Forms: Keep plowing until the sawdust becomes hot enough to form a glowing ember.
    5. Ignite Tinder and Build Fire: Carefully transfer the ember to your tinder and proceed as with other methods.

    The fire plow method requires specific types of wood and can be quite tiring.

    Step 7: Essential Tips for Success

    • Practice: The key to successfully starting a fire without matches is practice. Practice these methods in a safe environment before you need to rely on them in an emergency.
    • Use Dry Materials: Wet tinder, kindling, and fuelwood will not ignite easily. Look for dry materials, even inside dead standing trees.
    • Protect Your Tinder from Wind: Shield your tinder bundle from wind while trying to catch a spark.
    • Be Patient: Starting a fire without matches can take time and effort. Don’t get discouraged if you don’t succeed on your first try.
    • Safety First: Always build your fire in a safe location, away from dry vegetation and overhanging branches. Have water or sand nearby to extinguish the fire if needed.

    My Personal Perspective on Wilderness Fire Starting

    While I haven’t personally been in a survival situation requiring these methods, I’ve dedicated time to understanding and learning about them. The ability to create fire is a cornerstone of survival, providing warmth, safety, and the means to cook and purify water. Mastering even one of these techniques can significantly boost your confidence and preparedness in the outdoors. The ferro rod method is generally considered the most reliable for beginners.

    Learning how to start a fire without matches in the wilderness is a valuable skill that can provide comfort and safety in survival situations. By understanding these methods and practicing them, you can increase your self-reliance and preparedness for the unexpected. Stay safe and happy trails!

    SEO Meta Description: Learn how to start a fire without matches in the wilderness using various methods like ferro rods, magnifying glasses, and friction techniques. Essential survival skills explained step-by-step.


  • How to Build a Shelter in the Wild

    How to Build a Shelter in the Wild

    Surviving in the wilderness is an essential skill that many outdoor enthusiasts and adventurers strive to master. One of the most critical components of survival is knowing how to build a shelter in the wild. A well-constructed shelter can protect you from harsh weather, dangerous animals, and other potential hazards while providing a sense of security and comfort.

    Why Building a Shelter is Crucial

    When stranded in the wilderness, exposure to the elements can quickly become a life-threatening issue. Hypothermia, heatstroke, or dehydration can set in if you lack proper protection. A shelter provides:

    • Protection from Weather: It shields you from rain, snow, wind, and intense sun.
    • Temperature Regulation: It helps retain body heat in cold conditions or provides shade in hot climates.
    • Safety from Wildlife: A shelter acts as a barrier against insects and larger predators.
    • Psychological Comfort: Having a secure place to rest can boost morale and reduce stress.

    Assessing Your Environment

    Before diving into how to build a shelter in the wild, it’s essential to assess your surroundings. The type of shelter you construct depends on several factors:

    1. Climate and Weather: Are you dealing with rain, snow, or heat?
    2. Available Resources: Do you have access to branches, leaves, or rocks?
    3. Terrain: Is the ground flat, sloped, or rocky?
    4. Time: How quickly do you need the shelter?

    Once you’ve evaluated these factors, you can choose the most suitable shelter type.

    Types of Shelters

    There are several types of shelters you can build depending on your environment and the resources at hand. Here are some common options:

    1. Lean-To Shelter

    A lean-to is one of the simplest shelters to construct and is ideal if you’re short on time. Here’s how to build it:

    • Materials Needed: Long branches, smaller sticks, leaves, or debris.
    • Steps:
      1. Find two sturdy trees close together or place a long branch between two supports.
      2. Lean other branches against this horizontal branch at an angle to form a sloping roof.
      3. Cover the slanted side with leaves, grass, or debris for insulation.
    • Pros: Quick and easy to build, effective against wind and light rain.
    • Cons: Limited protection against heavy rain or snow.

    2. Debris Hut

    A debris hut is excellent for cold conditions as it provides insulation.

    • Materials Needed: Long branches, smaller sticks, and lots of leaves or pine needles.
    • Steps:
      1. Create a ridgepole by propping a long branch against a tree or support.
      2. Arrange shorter branches along both sides of the ridgepole to form a triangular frame.
      3. Cover the frame with debris like leaves or grass, ensuring no gaps.
      4. Add more debris inside for bedding.
    • Pros: Excellent insulation, suitable for cold climates.
    • Cons: Time-consuming to build.

    3. Tarp Shelter

    If you’re carrying a tarp or poncho, this type of shelter is quick to set up.

    • Materials Needed: Tarp, rope, and stakes or heavy rocks.
    • Steps:
      1. Tie a rope between two trees and drape the tarp over it.
      2. Secure the edges of the tarp to the ground with stakes or rocks.
      3. Adjust the height and angle for optimal coverage.
    • Pros: Lightweight, portable, and easy to set up.
    • Cons: Requires pre-packed equipment.

    4. Snow Cave

    If you’re in a snowy area, a snow cave offers excellent insulation and protection.

    • Materials Needed: Snow and a digging tool (or your hands).
    • Steps:
      1. Find a deep snowdrift and start digging a tunnel into it.
      2. Hollow out a chamber, ensuring the ceiling is domed to prevent collapse.
      3. Create a ventilation hole and smooth the interior walls to reduce dripping.
    • Pros: Warm and protective in freezing temperatures.
    • Cons: Requires significant effort and knowledge to avoid collapse.

    Step-by-Step Instructions for Building a Shelter

    Regardless of the shelter type, some general principles apply. Here’s a step-by-step guide:

    1. Choose a Safe Location: Look for an area that is:
      • Away from hazards like falling branches or flooding zones.
      • Close to resources like water and materials.
      • Naturally sheltered, such as near rock outcroppings.
    2. Gather Materials: Collect everything you need before starting construction. Use natural resources like branches, leaves, and rocks.
    3. Construct the Frame: Start with a sturdy base. For most shelters, this involves creating a strong ridgepole or frame to support the structure.
    4. Add Insulation: Use leaves, grass, or debris to insulate your shelter. Thick layers are crucial for maintaining warmth and keeping out moisture.
    5. Secure the Shelter: Ensure your shelter is stable. Use rope, vines, or additional branches to reinforce it.
    6. Test Your Shelter: Crawl inside and check for gaps or weak spots. Make adjustments as needed.

    Tips for Success

    • Work with Nature: Use natural formations like caves, overhangs, or fallen trees to save time and effort.
    • Prioritize Insulation: A well-insulated shelter can mean the difference between comfort and hypothermia.
    • Keep It Small: A smaller shelter retains heat better and requires fewer resources.
    • Stay Dry: Elevate yourself off damp ground using leaves, grass, or a tarp.

    Mistakes to Avoid

    • Ignoring Location Risks: Avoid building near rivers, animal trails, or under unstable trees.
    • Using Wet Materials: Wet branches or leaves can make your shelter colder.
    • Skipping Ventilation: Poor airflow can lead to condensation or suffocation, especially in snow caves.

    Final Thoughts

    Knowing how to build a shelter in the wild is a vital survival skill that can save your life in emergencies. With practice and preparation, you’ll feel confident tackling various environments and conditions. Remember, the key to a successful shelter is choosing the right type for your situation, working efficiently, and using the resources around you wisely.

    The next time you’re exploring the great outdoors, take some time to practice building a shelter. Not only is it a fun and rewarding activity, but it also ensures you’re prepared for any unexpected situations that might arise. Whether it’s a simple lean-to or a well-insulated debris hut, mastering this skill can make all the difference in your wilderness adventures.