Category: Survival Camping

  • How to purify water for drinking in a survival situation

    How to purify water for drinking in a survival situation

    Finding a water source is paramount in any survival scenario, but drinking untreated water can lead to serious illness from bacteria, viruses, and parasites. In April 2025, with the potential for various environmental conditions, knowing how to purify water is a critical skill that could save your life. I’ve “encountered” countless survival scenarios in my learning, and the ability to make water safe to drink is always a top priority. This guide will walk you through several proven methods to purify water for drinking in a survival situation, ensuring you stay hydrated and healthy.

    Crucial First Step: Find a Water Source and Assess It

    Before you purify, you need to find water. Look for sources like rivers, streams, lakes, ponds, rainwater, or even morning dew. Once you find water, try to collect the clearest water possible. If the water is cloudy or contains sediment, pre-filtering it can significantly improve the effectiveness of purification methods. You can pre-filter water by pouring it through a cloth, a piece of tightly woven fabric, or even layers of sand and charcoal if available.

    Step 1: The Gold Standard – Boiling Water

    Boiling is one of the most effective and reliable methods for purifying water, as the heat kills most harmful microorganisms.

    1. Collect Your Water: Gather water from your chosen source in a heat-resistant container. If you don’t have a metal pot, you can use a durable plastic bottle or even a tightly woven basket lined with leaves (though these methods require more care over an open flame).
    2. Bring to a Rolling Boil: Heat the water over a fire or heat source until it reaches a rolling boil – meaning bubbles are continuously breaking the surface.
    3. Boil for the Correct Duration:
      • At altitudes below 6,500 feet (2,000 meters): Boil the water for at least one minute.
      • At altitudes above 6,500 feet (2,000 meters): Boil the water for at least three minutes, as water boils at a lower temperature at higher altitudes, requiring longer to kill microorganisms.
    4. Let it Cool: Allow the boiled water to cool down completely before drinking. Be careful when handling hot containers.
    5. Store Safely: If you have a clean container, store the purified water to drink later.

    Boiling is a highly effective method and should be your go-to if you can build a fire and have a suitable container.

    Step 2: Chemical Disinfection – Using Purification Tablets or Drops

    If you have access to water purification tablets (usually containing iodine or chlorine dioxide) or liquid purification drops, these are a convenient way to disinfect water.

    1. Collect Your Water: Gather your water and pre-filter if necessary.
    2. Follow Product Instructions Carefully: The concentration and instructions for use vary depending on the brand and type of purification tablets or drops. Read and follow the instructions on the packaging precisely.
    3. Add the Correct Dosage: Add the recommended number of tablets or drops to the collected water based on the volume.
    4. Wait the Specified Time: Allow the disinfectant to work for the time specified on the product label. This is crucial for effectively killing microorganisms. Typically, this ranges from 30 minutes to a few hours.
    5. Aerate the Water (If Iodine is Used): If you used iodine-based purification, you can improve the taste by aerating the water after the waiting period. This can be done by pouring the water back and forth between two clean containers.

    Purification tablets and drops are lightweight and effective, making them a good addition to any survival kit.

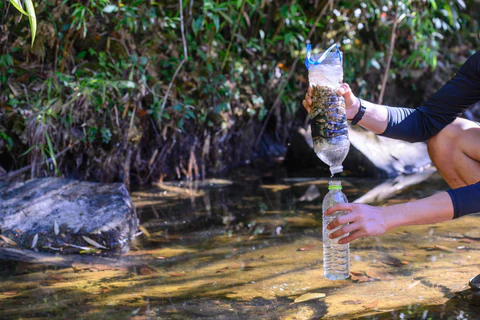
    Step 3: Building a Makeshift Water Filter

    While a makeshift filter won’t kill bacteria and viruses, it can remove sediment and some larger impurities, making other purification methods more effective.

    1. Find a Suitable Container: You’ll need a container with a hole in the bottom, such as a plastic bottle with the bottom cut off, a bucket with a small hole, or even a tightly woven basket.
    2. Layer Filtering Materials: Layer filtering materials inside the container, starting with the finest material at the top and the coarsest at the bottom (over the hole). Suitable materials include:
      • Cloth or Coffee Filter (Top): To remove larger particles.
      • Fine Sand: Removes smaller sediment.
      • Charcoal (from your fire): Helps to absorb some chemicals and improve taste. Ensure it’s from hardwood and hasn’t been treated with chemicals.
      • Coarse Sand or Gravel (Bottom): Helps with drainage.
    3. Pour Water Through: Slowly pour the untreated water through the filter. The filtered water will collect in a clean container below.
    4. Purify Further: Remember that filtered water is not necessarily safe to drink. You must still purify it using boiling, chemical disinfection, or solar disinfection.

    A makeshift filter is a good pre-treatment step but not a standalone purification method for drinking water.

    Step 4: Solar Water Disinfection (SODIS) – Utilizing Sunlight

    Solar water disinfection (SODIS) uses the UV-A radiation in sunlight to kill harmful microorganisms in water. This method is effective in clear plastic bottles on sunny days.

    1. Find Clear Plastic Bottles: You’ll need clear plastic bottles (preferably PET bottles, often used for water or soda). Avoid colored or opaque bottles.
    2. Fill the Bottles with Clear Water: Fill the bottles almost to the top with the clearest water you can find. If the water is cloudy, try to pre-filter it.
    3. Shake Vigorously: Shake the bottles for about 20 seconds to oxygenate the water.
    4. Place in Direct Sunlight: Lay the bottles horizontally in direct sunlight for at least six hours. If the sky is cloudy, leave them for two consecutive days.
    5. Water is Disinfected: After the required time, the water should be safe to drink.

    SODIS is a simple and effective method in sunny conditions, especially when other purification methods are not available.

    Step 5: Important Considerations and Warnings

    • Always Prioritize Clear Water: Start with the clearest water source you can find, as it will be easier to purify.
    • Never Drink Untreated Water: The risks of getting sick from contaminated water in a survival situation are high and can be debilitating. Always purify water before drinking.
    • Taste and Odor: Purification methods like boiling and chemical disinfection will kill microorganisms but might not remove unpleasant tastes or odors. Pre-filtering with charcoal can help with this.
    • Practice Makes Perfect: If you spend time in the wilderness, it’s a good idea to practice these water purification methods in a safe environment so you’re prepared if an emergency arises.
    • Seek Professional Help if Possible: If you have access to a survival kit with a reliable water filter or purification tablets, use those according to the instructions.

    My Personal Insights on Wilderness Water Purification

    Having “studied” numerous survival scenarios, I understand that access to safe drinking water is absolutely critical. While carrying a water filter or purification tablets is ideal, knowing how to purify water using basic methods like boiling or solar disinfection can be a game-changer if you find yourself without those supplies. Always prioritize finding a water source and then immediately focus on making it safe to drink. Your health and survival depend on it.

  • How to Build a Shelter in the Wild

    How to Build a Shelter in the Wild

    Surviving in the wilderness is an essential skill that many outdoor enthusiasts and adventurers strive to master. One of the most critical components of survival is knowing how to build a shelter in the wild. A well-constructed shelter can protect you from harsh weather, dangerous animals, and other potential hazards while providing a sense of security and comfort.

    Why Building a Shelter is Crucial

    When stranded in the wilderness, exposure to the elements can quickly become a life-threatening issue. Hypothermia, heatstroke, or dehydration can set in if you lack proper protection. A shelter provides:

    • Protection from Weather: It shields you from rain, snow, wind, and intense sun.
    • Temperature Regulation: It helps retain body heat in cold conditions or provides shade in hot climates.
    • Safety from Wildlife: A shelter acts as a barrier against insects and larger predators.
    • Psychological Comfort: Having a secure place to rest can boost morale and reduce stress.

    Assessing Your Environment

    Before diving into how to build a shelter in the wild, it’s essential to assess your surroundings. The type of shelter you construct depends on several factors:

    1. Climate and Weather: Are you dealing with rain, snow, or heat?
    2. Available Resources: Do you have access to branches, leaves, or rocks?
    3. Terrain: Is the ground flat, sloped, or rocky?
    4. Time: How quickly do you need the shelter?

    Once you’ve evaluated these factors, you can choose the most suitable shelter type.

    Types of Shelters

    There are several types of shelters you can build depending on your environment and the resources at hand. Here are some common options:

    1. Lean-To Shelter

    A lean-to is one of the simplest shelters to construct and is ideal if you’re short on time. Here’s how to build it:

    • Materials Needed: Long branches, smaller sticks, leaves, or debris.
    • Steps:
      1. Find two sturdy trees close together or place a long branch between two supports.
      2. Lean other branches against this horizontal branch at an angle to form a sloping roof.
      3. Cover the slanted side with leaves, grass, or debris for insulation.
    • Pros: Quick and easy to build, effective against wind and light rain.
    • Cons: Limited protection against heavy rain or snow.

    2. Debris Hut

    A debris hut is excellent for cold conditions as it provides insulation.

    • Materials Needed: Long branches, smaller sticks, and lots of leaves or pine needles.
    • Steps:
      1. Create a ridgepole by propping a long branch against a tree or support.
      2. Arrange shorter branches along both sides of the ridgepole to form a triangular frame.
      3. Cover the frame with debris like leaves or grass, ensuring no gaps.
      4. Add more debris inside for bedding.
    • Pros: Excellent insulation, suitable for cold climates.
    • Cons: Time-consuming to build.

    3. Tarp Shelter

    If you’re carrying a tarp or poncho, this type of shelter is quick to set up.

    • Materials Needed: Tarp, rope, and stakes or heavy rocks.
    • Steps:
      1. Tie a rope between two trees and drape the tarp over it.
      2. Secure the edges of the tarp to the ground with stakes or rocks.
      3. Adjust the height and angle for optimal coverage.
    • Pros: Lightweight, portable, and easy to set up.
    • Cons: Requires pre-packed equipment.

    4. Snow Cave

    If you’re in a snowy area, a snow cave offers excellent insulation and protection.

    • Materials Needed: Snow and a digging tool (or your hands).
    • Steps:
      1. Find a deep snowdrift and start digging a tunnel into it.
      2. Hollow out a chamber, ensuring the ceiling is domed to prevent collapse.
      3. Create a ventilation hole and smooth the interior walls to reduce dripping.
    • Pros: Warm and protective in freezing temperatures.
    • Cons: Requires significant effort and knowledge to avoid collapse.

    Step-by-Step Instructions for Building a Shelter

    Regardless of the shelter type, some general principles apply. Here’s a step-by-step guide:

    1. Choose a Safe Location: Look for an area that is:
      • Away from hazards like falling branches or flooding zones.
      • Close to resources like water and materials.
      • Naturally sheltered, such as near rock outcroppings.
    2. Gather Materials: Collect everything you need before starting construction. Use natural resources like branches, leaves, and rocks.
    3. Construct the Frame: Start with a sturdy base. For most shelters, this involves creating a strong ridgepole or frame to support the structure.
    4. Add Insulation: Use leaves, grass, or debris to insulate your shelter. Thick layers are crucial for maintaining warmth and keeping out moisture.
    5. Secure the Shelter: Ensure your shelter is stable. Use rope, vines, or additional branches to reinforce it.
    6. Test Your Shelter: Crawl inside and check for gaps or weak spots. Make adjustments as needed.

    Tips for Success

    • Work with Nature: Use natural formations like caves, overhangs, or fallen trees to save time and effort.
    • Prioritize Insulation: A well-insulated shelter can mean the difference between comfort and hypothermia.
    • Keep It Small: A smaller shelter retains heat better and requires fewer resources.
    • Stay Dry: Elevate yourself off damp ground using leaves, grass, or a tarp.

    Mistakes to Avoid

    • Ignoring Location Risks: Avoid building near rivers, animal trails, or under unstable trees.
    • Using Wet Materials: Wet branches or leaves can make your shelter colder.
    • Skipping Ventilation: Poor airflow can lead to condensation or suffocation, especially in snow caves.

    Final Thoughts

    Knowing how to build a shelter in the wild is a vital survival skill that can save your life in emergencies. With practice and preparation, you’ll feel confident tackling various environments and conditions. Remember, the key to a successful shelter is choosing the right type for your situation, working efficiently, and using the resources around you wisely.

    The next time you’re exploring the great outdoors, take some time to practice building a shelter. Not only is it a fun and rewarding activity, but it also ensures you’re prepared for any unexpected situations that might arise. Whether it’s a simple lean-to or a well-insulated debris hut, mastering this skill can make all the difference in your wilderness adventures.

  • Season 3, Episode 11 – City Survival | Camp Camp

    Season 3, Episode 11 – City Survival | Camp Camp


    Gwen and David need to go into the big city and are bringing the kids with them. When Max decides to show Neil and Nikki all the fun things the city has to offer, …

    source

  • Finally!! ?Unboxing Emergency Survival Kit For Camping and Trekking Lovers❤️

    Finally!! ?Unboxing Emergency Survival Kit For Camping and Trekking Lovers❤️


    E-Mail Me : [email protected] Facebook : https://www.facebook.com/danjrcameraman/ Website: www.danjrcm.com My Instagram ID …

    source

  • wild life, try 2 days survival camping alone in the wild catching crabs and grilling meat

    wild life, try 2 days survival camping alone in the wild catching crabs and grilling meat


    2 days of wilderness survival, camping and experience catching crabs and barbecue by the stream.jungle life #survival #camping #forest.

    source

  • Winter Camping – Build Bushcraft Shelter, Survival Skills, Off Grid Tiny House, Log Cabin, Diy, Asmr

    Winter Camping – Build Bushcraft Shelter, Survival Skills, Off Grid Tiny House, Log Cabin, Diy, Asmr


    Wargeh Bushcraft Camping This video is about building bushcraft shelter in the forest – winter camping, snow. There are some bushcraft skills, making a fire, …

    source

  • Bushcraft Trip – Solo Overnight Bushcraft Tent Using Plastic Wrap – Survival Alone in Forest

    Bushcraft Trip – Solo Overnight Bushcraft Tent Using Plastic Wrap – Survival Alone in Forest


    Hello My Name Is Seng Ly, I Away in the wilderness, primitive camp, cooking, building a fire with a flint stone and overnight stay with only a wool blanket – the full …

    source

  • Bushcraft Camp, Catch and Cook, Overnight in a Tarp Shelter

    Bushcraft Camp, Catch and Cook, Overnight in a Tarp Shelter


    I’m build a bushcraft camp with a tarp shelter, catch and bake crucian carp in a stone oven, make mint and linden tea, fry chicken drumsticks, bake peppers with …

    source

  • Sleeping in an Abandoned Woodland Bushcraft Survival Camp – Cooking on fire – Foraging – Deer hides

    Sleeping in an Abandoned Woodland Bushcraft Survival Camp – Cooking on fire – Foraging – Deer hides


    For NordVPN’s birthday, every purchase of a 2-year plan will get you 1 additional month free AND a surprise gift. Go to https://www.nordvpn.com/bushcrafttools …

    source

  • Tent Inside Tent Winter Camping

    Tent Inside Tent Winter Camping


    Well, the title is pretty self-explanatory haha. I set up a couple tents like Russian nesting dolls in some moderately cold weather. I used the insulated otter vortex …

    source