In a wilderness survival scenario, having a functional utensil can significantly improve your ability to eat and stay nourished. While purpose-built carving tools are ideal, knowing how to carve a spoon using a survival knife is a valuable skill that utilizes the most basic and essential piece of bushcraft gear. This guide will walk you through the process, focusing on safety, effective techniques, and making the most of limited tools.
Why Carve a Spoon in a Survival Situation?
Eating hot food or consuming liquids like broth can be challenging and messy without a spoon. A carved spoon provides:
- Hygiene: Prevents direct contact with hot food or contaminated surfaces.
- Efficiency: Allows for easier consumption of stews, porridges, or liquids.
- Morale: A small comfort that can boost spirits in a difficult situation.
- Practice: Hones your knife skills, a crucial element of survival.
Safety First: Essential Precautions
Carving with a survival knife is inherently risky. Sharp tools require extreme caution.
- Always Carve Away from Your Body: This is the most crucial rule to prevent accidental cuts.
- Wear Gloves (if available): Protects your non-dominant hand from slips.
- Maintain a Stable Grip: Ensure both your knife and the wood are held firmly.
- Use Controlled, Short Strokes: Avoid long, uncontrolled cuts that can slip.
- Keep Your Blade Sharp: A dull knife is more dangerous as it requires more force, increasing the chance of a slip.
- Clear Your Workspace: Remove any distractions or obstacles.
Materials and Tools You’ll Need
To carve a spoon using a survival knife, you primarily need:
- Survival Knife: A fixed-blade knife with a sturdy, full tang is ideal. The blade should be sharp.
- Wood:
- Green Wood (Freshly Cut): Much easier to carve than dry wood. Look for fallen branches or small saplings.
- Ideal Wood Types: Willow, birch, maple, sycamore, basswood, aspen, and fruitwoods are relatively soft and carve well. Avoid extremely hard woods like oak or very resinous woods like pine (unless it’s your only option).
- Branch Size: A branch about 1.5 to 2 inches in diameter and 8-12 inches long is a good starting point.
- Optional (but helpful):
- Saw: For quickly cutting your wood blank to size. Your survival knife might have a saw back, or you can use its batoning technique.
- Sharpening Stone/Strop: To maintain your knife’s edge.
- Larger piece of wood/log: For batoning (splitting wood) safely.
Step-by-Step Guide: Carving a Spoon
This process requires patience and deliberate action.
Phase 1: Preparing the Wood Blank
- Select Your Wood: Find a suitable piece of green wood, roughly 1.5 to 2 inches in diameter and 8-12 inches long. Look for relatively straight grain and no major knots or defects.
- Cut the Blank to Length:
- If you have a saw, cut the branch to your desired spoon length (e.g., 8-10 inches).
- If using only your survival knife, you can carefully baton the branch. Place the blade on the branch where you want to cut, and then strike the spine of the blade with a piece of heavier wood to drive it through. Be extremely careful not to cut yourself.
- Split the Wood (Optional but Recommended): For a flatter, easier-to-carve surface, you can split the branch lengthwise down the middle. Use the batoning method to split it carefully. This gives you two halves, each potentially becoming a spoon. If the branch is small enough (under 2 inches), you can carve directly from the round piece, but it will be more challenging.
Phase 2: Shaping the Outer Profile
- Rough Out the Shape: Visualize your spoon. It has a bowl, a neck, and a handle.
- Marking (Optional): You can use a piece of charcoal or the knife tip to lightly sketch the outline of your spoon on the wood blank.
- Carve the Handle and Neck:
- Remove Bulk: Using a controlled push cut (pushing the blade away from you with your thumb or palm for control) or a chest lever cut (holding the knife against your chest, bracing the wood with your other hand, and pulling the wood towards the blade), begin to remove wood from the sides of what will be the handle and the narrower neck section.
- Establish Thickness: Reduce the thickness of the handle to a comfortable grip. Remember to always cut away from your body.
- Define the Bowl Shape:
- Taper: Gradually taper the wood from the neck outwards to form the general shape of the spoon bowl. Think of an oval or rounded shape.
- Rough Edges: Don’t worry about the hollowing yet; just get the outer perimeter and thickness of the bowl section established.
Phase 3: Hollowing the Bowl
This is the most challenging part with a survival knife.
- Establish the Bowl’s Edge: Use the tip of your knife to carefully score a circle or oval that defines the outer edge of your bowl. This provides a boundary.
- Hollow Out (Leverage and Thumb Push):
- Initial Cuts: Place the tip of your knife inside the marked bowl area. Using your thumb on the spine of the blade for leverage and control, slowly push the blade into the wood, scooping out small chips.
- Gouge Motion: Angle the blade slightly and use a gentle rocking or scooping motion to remove material. Always keep your non-carving hand well clear of the blade’s path.
- Rotation: Rotate the spoon as you work, moving from the center outwards to create the desired concave shape.
- Patience is Key: This will take time and many small cuts. Avoid trying to remove large chunks, as this can lead to slips or cracking the wood.
- Consider a ‘Hook’ Edge: If your knife has a slight curve or a robust tip, it can be slightly easier to scoop out the bowl. Some larger survival knives might have a belly that helps.
Phase 4: Refining and Finishing
- Smooth the Surfaces: Once the basic shape and hollow are achieved, go back over all surfaces with smaller, finer cuts.
- Pare Cuts: Use short, controlled pare cuts (where the blade is pulled towards you, but with your other hand controlling the wood, ensuring the blade never points at your body) to smooth out any rough edges or tool marks.
- Rounded Edges: Round off all sharp edges on the handle and bowl for comfort.
- Check for Comfort and Functionality: Hold the spoon. Does the handle feel good in your hand? Is the bowl deep enough to hold food? Make any necessary adjustments.
- Optional Sanding/Polishing:
- In a survival situation, this is less critical. However, if you have fine-grit rock, sand, or rough cloth, you can rub down the spoon for a smoother finish.
- Burnishing: You can also use a hard, smooth object (like a smooth stone or another piece of hardwood) to rub the spoon vigorously. This compacts the wood fibers, making it smoother and more durable.
- Preservation (Optional):
- If you have any animal fat, vegetable oil (from seeds/nuts), or even tree sap, you can rub it into the wood. This helps seal the wood, makes it more water-resistant, and prevents cracking.
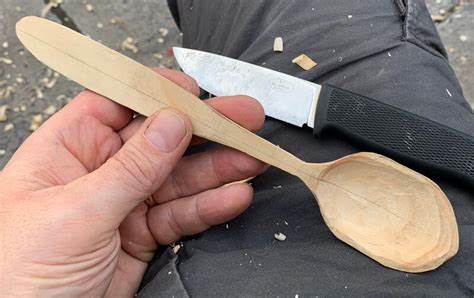
My Personal Experience Carving with Limited Tools
I remember my first attempt at carving a spoon in a bushcraft course. I had a decent fixed-blade knife, but no specialized hook knife. Hollowing the bowl felt like trying to dig a hole with a flat shovel. It was slow, and frustrating at times. The biggest lesson was patience and understanding that with a single tool, every cut needs to be precise and deliberate. I learned to use the tip of my knife almost like a drill, slowly excavating small chips, and then using the blade’s belly for broader scooping motions. The final spoon wasn’t a work of art, but it functioned, and the satisfaction of eating my trail stew with something I had made myself was immense. It truly taught me the value of resourcefulness and basic tool mastery.
Conclusion
Carving a spoon using a survival knife is a testament to your resourcefulness and skill in a wilderness environment. While it demands patience and precision, the ability to create a functional utensil from raw materials can make a significant difference to your comfort and well-being. Always prioritize safety, choose your wood wisely, and approach each cut with control. With practice, you’ll gain confidence in your knife skills and the satisfaction of self-sufficiency.