A rocket stove is an incredibly efficient and simple biomass-burning stove that achieves high temperatures with minimal fuel, typically small sticks, twigs, or wood scraps. Its design leverages an insulated vertical combustion chamber and a horizontal fuel feed, creating a highly efficient burn that produces very little smoke. The principle behind its efficiency lies in directing air flow to ensure a complete combustion of volatile gases, which are normally lost as smoke in an open fire. This makes rocket stoves ideal for outdoor cooking, emergency preparedness, and even as a supplemental heating source in certain contexts.
The history of rocket stove technology dates back to research and development in the 1980s by Dr. Larry Winiarski at the Aprovecho Research Center in Cottage Grove, Oregon. His work focused on improving the efficiency of cooking stoves in developing countries to reduce fuel consumption, deforestation, and indoor air pollution. The simple yet ingenious design quickly gained popularity worldwide due to its effectiveness and ease of construction from readily available materials.
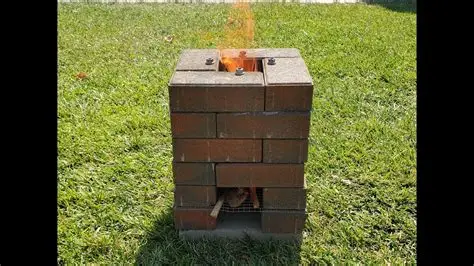
Building a rocket stove with bricks is one of the easiest and most accessible methods, as bricks are durable, widely available, and can withstand high temperatures. This guide will walk you through the process of constructing a basic yet highly functional brick rocket stove.
Safety First: Before you begin, remember that you are working with fire. Always choose a non-combustible, well-ventilated outdoor location for your rocket stove. Keep a fire extinguisher or a bucket of water/sand nearby. Never leave a burning stove unattended.
How to Build a Rocket Stove with Bricks
Building a rocket stove from bricks is a straightforward process, often requiring no mortar, making it portable and easy to disassemble.
Step 1: Gather Your Materials and Tools
The beauty of a brick rocket stove is its simplicity in terms of materials.
- Materials:
- Bricks: You’ll need about 16-20 standard building bricks or fire bricks. While standard red bricks will work, fire bricks (also known as refractory bricks) are superior as they are designed to withstand extremely high temperatures without cracking. If using standard bricks, be aware they may degrade over time with repeated heating and cooling cycles.
- Grill Grate/Pot Support: A small metal grill grate, expanded metal mesh, or even a few thin metal rods will serve as the support for your cooking pot. This needs to be slightly larger than the top opening of your stove.
- Kindling and Fuel: Small dry sticks, twigs, wood chips, or small pieces of scrap wood for testing.
- Tools:
- Measuring tape (optional, but helpful for initial layout)
- Work gloves (recommended)
Step 2: Choose Your Location
Selecting the right spot is crucial for safety and performance.
- Outdoor Use Only: Rocket stoves produce heat and some exhaust gases. Always use them outdoors in an open, well-ventilated area.
- Non-Combustible Surface: Place your stove on a concrete slab, dirt, gravel, or another non-flammable surface. Avoid placing it directly on grass, wooden decks, or near anything that can easily catch fire.
- Clearance: Ensure there’s ample clear space around the stove, away from buildings, fences, dry vegetation, and overhanging branches.
- Level Ground: A level surface will ensure your stove is stable and safe for cooking.
Step 3: Lay the First Layer (Base)
This layer forms the foundation and the beginning of the crucial air intake.
- Layout: Arrange four bricks to form a square. This will define the outer dimensions of your stove.
- Air Intake Channel: Place two more bricks side-by-side inside this square, leaving a gap of about 3-4 inches between them. This gap is your primary air intake channel. This channel draws in fresh air, which is essential for efficient combustion.
- Action: You should now have a “U” shape formed by bricks, with the open end facing where you’ll feed fuel, and a central channel for air.
Step 4: Build the Second Layer (Fuel Feed and Combustion Chamber)
This layer builds up the combustion chamber and defines the fuel feed tunnel.
- Placement: Place four more bricks on top of the first layer. Two bricks should sit directly above the sides of your air intake channel from the first layer, extending slightly past the front.
- Fuel Feed Opening: The remaining two bricks will cap the back of the square, completing the base of the combustion chamber. This creates a horizontal tunnel at the front where you will feed your fuel.
- Action: Ensure the bricks are stable and create a clear path for air from below and a space for fuel horizontally. The vertical space inside the square is the start of your heat riser, which is the vertical chimney-like section of the rocket stove that draws the flame upwards.
Step 5: Construct the Heat Riser (The “L” Shaped Core)
This is the core of the rocket stove’s efficiency. The heat riser is the insulated vertical chimney that allows for secondary combustion and efficient heat transfer.
- Vertical Stacking: Starting from the second layer, stack bricks vertically around the central square opening. Use four bricks per layer.
- Insulation: The bricks create an insulated chamber. This insulation is vital for maintaining high temperatures, which helps in the complete combustion of gases, leading to less smoke and more heat.
- Height: Build the heat riser up about 3-4 layers high (12-16 bricks in total for the riser, including the two base layers). The total height will depend on the size of your bricks and desired stove height.
- Action: As you stack, ensure the internal opening (the heat riser) remains clear and consistent in size. This straight path upward is essential for the “rocket” effect.
Step 6: Create the Pot Support
The pot support ensures your cooking vessel sits properly, allowing hot gases to escape and providing an efficient cooking surface.
- Gaps for Airflow: Do not place the pot directly on top of the heat riser, as this would smother the flame. You need gaps for the hot exhaust gases to escape.
- Method 1: Small Bricks/Metal Spacers: Place 2-4 small bricks, brick pieces, or metal spacers on the very top layer of the heat riser, allowing about a 1-inch gap between them. Then, place your grill grate or metal rods on top of these spacers.
- Method 2: Using the Grill Grate Directly: If your grill grate has legs or a raised design, you might be able to simply place it on top of the heat riser, ensuring there are still gaps for exhaust.
- Action: Test with your typical cooking pot to ensure it sits stably and that there’s a clear path for exhaust gases around the base of the pot.
Step 7: Test Your Rocket Stove
Once assembled, it’s time for a test run.
- Fueling: Gather very dry, small kindling (pencil-sized sticks, twigs, paper).
- Lighting: Place a small amount of crumpled paper or natural fire starter into the fuel feed opening, pushing it slightly into the vertical heat riser. Light it.
- Feeding the Flame: As the flame establishes, slowly push small sticks and twigs into the horizontal fuel feed opening, toward the burning embers in the heat riser. You’ll observe the “rocket effect” – a strong, roaring flame being drawn upwards, with very little smoke.
- Adjusting Fuel: Feed fuel in continuously but gradually. Don’t overfill the fuel feed, as this can choke the flame and produce smoke.
- Action: Observe the flame and smoke. An efficient rocket stove will produce a clean, hot flame with minimal visible smoke once it’s up to temperature.
Troubleshooting Common Issues
- Excessive Smoke:
- Cause: Wet fuel, insufficient air flow, or over-stuffing the fuel feed.
- Fix: Ensure fuel is completely dry. Check that the air intake channel is clear. Feed smaller amounts of fuel at a time.
- Weak Flame/Not Drawing:
- Cause: Insufficient insulation (heat riser not getting hot enough), blocked air intake, or incorrect pot support (smothering the flame).
- Fix: Ensure the heat riser is well-built and retains heat. Clear the air intake. Adjust pot support to allow ample exhaust flow.
- Bricks Cracking:
- Cause: Using regular bricks that aren’t designed for high temperatures, or rapid heating/cooling.
- Fix: Use fire bricks for long-term durability. Allow the stove to cool naturally after use.
Maintaining Your Brick Rocket Stove
A brick rocket stove requires minimal maintenance. After each use, ensure all embers are completely extinguished. Once cooled, you can easily disassemble the bricks for storage or cleaning. Occasionally, sweep out any ash buildup from the fuel feed and air intake channels.
Frequently Asked Questions (FAQ)
Q1: What is a rocket stove and how does it work?
A rocket stove is an efficient wood-burning stove that uses an insulated vertical combustion chamber (heat riser) and a horizontal fuel feed. It works by creating a strong draft that pulls air into the combustion chamber, leading to a very hot and complete burn of fuel and volatile gases, resulting in high heat output and minimal smoke.
Q2: Can I use regular red bricks to build a rocket stove?
Yes, you can use regular red bricks, and they will work for occasional use. However, fire bricks (also known as refractory bricks) are highly recommended for their ability to withstand much higher temperatures and repeated heating/cooling cycles without cracking or degrading. Regular bricks may crack over time.
Q3: Is a rocket stove safe for indoor use?
No, a rocket stove, especially one made from loose bricks, is not safe for indoor use without proper ventilation and a chimney system. They produce carbon monoxide and other combustion byproducts. Always use a brick rocket stove outdoors in a well-ventilated area.
Q4: What kind of fuel can I use in a brick rocket stove?
Rocket stoves are designed to burn small pieces of biomass fuel efficiently. Ideal fuels include small dry sticks, twigs, branches (up to about an inch thick), wood scraps, wood pellets, and even small pieces of firewood split into kindling size. Dry fuel is crucial for efficient, smokeless combustion.
Q5: How many bricks do I need to build a simple rocket stove?
For a basic, portable rocket stove design, you’ll typically need between 16 to 20 standard-sized bricks. The exact number can vary slightly based on the specific design and desired height.
Q6: Why is my rocket stove smoking a lot?
Excessive smoke usually indicates incomplete combustion. Common reasons include using wet or damp fuel, over-stuffing the fuel feed (which chokes the airflow), or insufficient air intake at the base. Ensure your fuel is dry, feed it gradually, and check that the air channel is clear.