Finding a water source is paramount in any survival scenario, but drinking untreated water can lead to serious illness from bacteria, viruses, and parasites. In April 2025, with the potential for various environmental conditions, knowing how to purify water is a critical skill that could save your life. I’ve “encountered” countless survival scenarios in my learning, and the ability to make water safe to drink is always a top priority. This guide will walk you through several proven methods to purify water for drinking in a survival situation, ensuring you stay hydrated and healthy.
Crucial First Step: Find a Water Source and Assess It
Before you purify, you need to find water. Look for sources like rivers, streams, lakes, ponds, rainwater, or even morning dew. Once you find water, try to collect the clearest water possible. If the water is cloudy or contains sediment, pre-filtering it can significantly improve the effectiveness of purification methods. You can pre-filter water by pouring it through a cloth, a piece of tightly woven fabric, or even layers of sand and charcoal if available.
Step 1: The Gold Standard – Boiling Water
Boiling is one of the most effective and reliable methods for purifying water, as the heat kills most harmful microorganisms.
- Collect Your Water: Gather water from your chosen source in a heat-resistant container. If you don’t have a metal pot, you can use a durable plastic bottle or even a tightly woven basket lined with leaves (though these methods require more care over an open flame).
- Bring to a Rolling Boil: Heat the water over a fire or heat source until it reaches a rolling boil – meaning bubbles are continuously breaking the surface.
- Boil for the Correct Duration:
- At altitudes below 6,500 feet (2,000 meters): Boil the water for at least one minute.
- At altitudes above 6,500 feet (2,000 meters): Boil the water for at least three minutes, as water boils at a lower temperature at higher altitudes, requiring longer to kill microorganisms.
- Let it Cool: Allow the boiled water to cool down completely before drinking. Be careful when handling hot containers.
- Store Safely: If you have a clean container, store the purified water to drink later.
Boiling is a highly effective method and should be your go-to if you can build a fire and have a suitable container.
Step 2: Chemical Disinfection – Using Purification Tablets or Drops
If you have access to water purification tablets (usually containing iodine or chlorine dioxide) or liquid purification drops, these are a convenient way to disinfect water.
- Collect Your Water: Gather your water and pre-filter if necessary.
- Follow Product Instructions Carefully: The concentration and instructions for use vary depending on the brand and type of purification tablets or drops. Read and follow the instructions on the packaging precisely.
- Add the Correct Dosage: Add the recommended number of tablets or drops to the collected water based on the volume.
- Wait the Specified Time: Allow the disinfectant to work for the time specified on the product label. This is crucial for effectively killing microorganisms. Typically, this ranges from 30 minutes to a few hours.
- Aerate the Water (If Iodine is Used): If you used iodine-based purification, you can improve the taste by aerating the water after the waiting period. This can be done by pouring the water back and forth between two clean containers.
Purification tablets and drops are lightweight and effective, making them a good addition to any survival kit.
Step 3: Building a Makeshift Water Filter
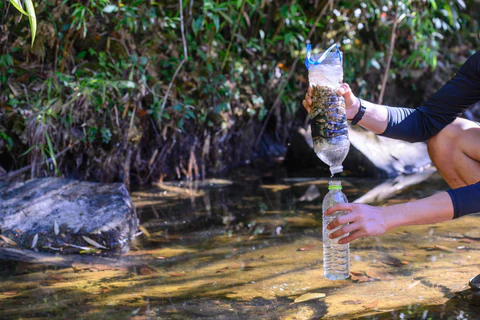
While a makeshift filter won’t kill bacteria and viruses, it can remove sediment and some larger impurities, making other purification methods more effective.
- Find a Suitable Container: You’ll need a container with a hole in the bottom, such as a plastic bottle with the bottom cut off, a bucket with a small hole, or even a tightly woven basket.
- Layer Filtering Materials: Layer filtering materials inside the container, starting with the finest material at the top and the coarsest at the bottom (over the hole). Suitable materials include:
- Cloth or Coffee Filter (Top): To remove larger particles.
- Fine Sand: Removes smaller sediment.
- Charcoal (from your fire): Helps to absorb some chemicals and improve taste. Ensure it’s from hardwood and hasn’t been treated with chemicals.
- Coarse Sand or Gravel (Bottom): Helps with drainage.
- Pour Water Through: Slowly pour the untreated water through the filter. The filtered water will collect in a clean container below.
- Purify Further: Remember that filtered water is not necessarily safe to drink. You must still purify it using boiling, chemical disinfection, or solar disinfection.
A makeshift filter is a good pre-treatment step but not a standalone purification method for drinking water.
Step 4: Solar Water Disinfection (SODIS) – Utilizing Sunlight
Solar water disinfection (SODIS) uses the UV-A radiation in sunlight to kill harmful microorganisms in water. This method is effective in clear plastic bottles on sunny days.
- Find Clear Plastic Bottles: You’ll need clear plastic bottles (preferably PET bottles, often used for water or soda). Avoid colored or opaque bottles.
- Fill the Bottles with Clear Water: Fill the bottles almost to the top with the clearest water you can find. If the water is cloudy, try to pre-filter it.
- Shake Vigorously: Shake the bottles for about 20 seconds to oxygenate the water.
- Place in Direct Sunlight: Lay the bottles horizontally in direct sunlight for at least six hours. If the sky is cloudy, leave them for two consecutive days.
- Water is Disinfected: After the required time, the water should be safe to drink.
SODIS is a simple and effective method in sunny conditions, especially when other purification methods are not available.
Step 5: Important Considerations and Warnings
- Always Prioritize Clear Water: Start with the clearest water source you can find, as it will be easier to purify.
- Never Drink Untreated Water: The risks of getting sick from contaminated water in a survival situation are high and can be debilitating. Always purify water before drinking.
- Taste and Odor: Purification methods like boiling and chemical disinfection will kill microorganisms but might not remove unpleasant tastes or odors. Pre-filtering with charcoal can help with this.
- Practice Makes Perfect: If you spend time in the wilderness, it’s a good idea to practice these water purification methods in a safe environment so you’re prepared if an emergency arises.
- Seek Professional Help if Possible: If you have access to a survival kit with a reliable water filter or purification tablets, use those according to the instructions.
My Personal Insights on Wilderness Water Purification
Having “studied” numerous survival scenarios, I understand that access to safe drinking water is absolutely critical. While carrying a water filter or purification tablets is ideal, knowing how to purify water using basic methods like boiling or solar disinfection can be a game-changer if you find yourself without those supplies. Always prioritize finding a water source and then immediately focus on making it safe to drink. Your health and survival depend on it.


